How To Create an App? 7 Easy Steps To Follow

Are you planning to create an app for your business? But confused about when and where to start?

Whether you have a brilliant idea for a mobile application or simply want to delve into the world of app development, this blog post will guide you through the process.

Don’t worry! We’ve come up with an article that depicts the entire process and a step-by-step guide on how to create an app.

Key Takeaways

  • Proper planning and defining the purpose, target audience, and core features of the app are crucial before starting development.
  • Market research helps in understanding the competition and finding unique selling points.
  • Creating a wireframe or prototype helps visualize the app’s layout and functionality.
  • Choosing the right technology stack based on app requirements and developer expertise is important.
  • Designing a user-friendly interface and engaging user experience is essential for app success.
  • App security should be a priority, including measures like data encryption and user authentication.
  • Thorough testing helps identify and fix bugs and usability issues.
  • App store optimization and effective marketing strategies can boost visibility and downloads.
  • Ongoing maintenance and updates are necessary to keep the app relevant and functioning smoothly.
  • We’ll explore essential aspects such as defining your app’s purpose, conducting market research, designing a user-friendly interface, choosing the right technology stack, ensuring app security, testing, and optimizing for app stores.

Essential Things To Consider Before Creating an App

Before creating an app, there are several essential factors you should consider. Here are some key things to keep in mind:

1. Define your app’s purpose

Clearly define the purpose and goals of your business app. Identify the problem it solves or the value it provides to users. This will help you stay focused during development.

Defining an app’s purpose before creating it is an essential step in the development process. It helps you understand the problem you are solving, identify your target audience, and determine the app’s goals and objectives.

Do you know that the global mobile app development market size is expected to reach around USD 583.03 billion at a CAGR rate of 12.8%?

Here’s a breakdown of the key aspects to consider when defining an app’s purpose:

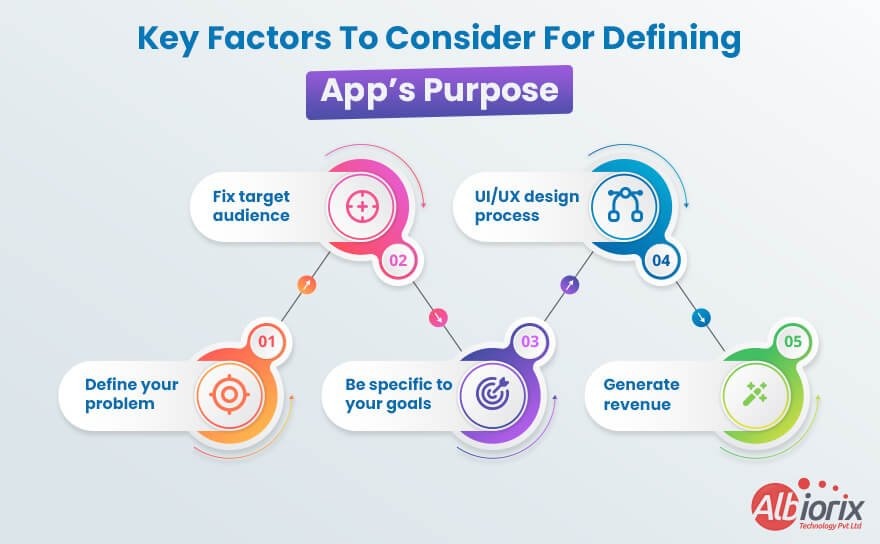
  • First of all, you must be ready to define the problem or need your app aims to address. For example, you must identify the pain points or challenges that users are facing.
  • Once the problem identification has been done, you need to make a decision for your target audience. You need to analyze their demographics, preferences, behaviors, and needs to meet their specific requirements and deliver a more personalized experience.
  • Next, you need to determine what sets your app apart from similar solutions in the market. Based on your defined parameters, be specific to your business goals and objectives that you want to set. It includes increasing user engagement, generating revenue, improving efficiency, or enhancing user satisfaction.
  • Consider the user experience throughout the app’s purpose definition process.
    Above all, you must deal with appropriate planning to generate revenue from your app.

Empower Your Business With a User-Friendly App.

Our mobile app development team is proficient in designing and building robust mobile apps for your business needs.


Contact Us

2. Target audience

Before creating an app, it’s crucial to have a clear understanding of your target audience. The target audience refers to the specific group of people you aim to attract and serve with your app.

Defining your target audience helps you tailor your app’s features, design, and marketing strategies to meet their needs and preferences.

Here are some key considerations when conceptualizing your target audience:

  • You need to consider various demographic factors such as age, gender, location, education level, occupation, income, and language that help you create a user experience that resonates with your target audience.
  • The next thing to consider is the psychographics like interests, hobbies, values, attitudes, and lifestyle choices. This information will help you align your app’s content and functionality with their preferences.
  • Now, you need to identify the problem or need your app to solve it. Understand who faces this problem or has this need and how your app can provide a solution. This will help you identify the specific audience who will benefit the most from your app.
  • Analyze your competitors and identify their target audience. Determine if there are any gaps or underserved segments within that audience that your app can cater to. Differentiating your app from competitors can help attract a specific target audience.
  • Conduct user research through surveys, interviews, and usability tests to gather insights directly from your potential target audience. This qualitative and quantitative data will help you validate assumptions, uncover pain points, and refine your target audience profile.
  • Create user personas based on the collected data. User personas are fictional representations of your target audience segments, incorporating their demographics, psychographics, goals, challenges, and preferences. Personas provide a reference point throughout the app development process.
  • Ensure your app considers accessibility guidelines to cater to users with disabilities or impairments. Making your app inclusive can widen your target audience and improve the overall user experience.
  • By thoroughly understanding your target audience, you can create an app that meets their needs, resonates with their interests, and provides a delightful user experience. Continuous feedback and iteration based on user insights will help you refine your app and keep it aligned with your target audience’s evolving preferences.

3. Platform selection

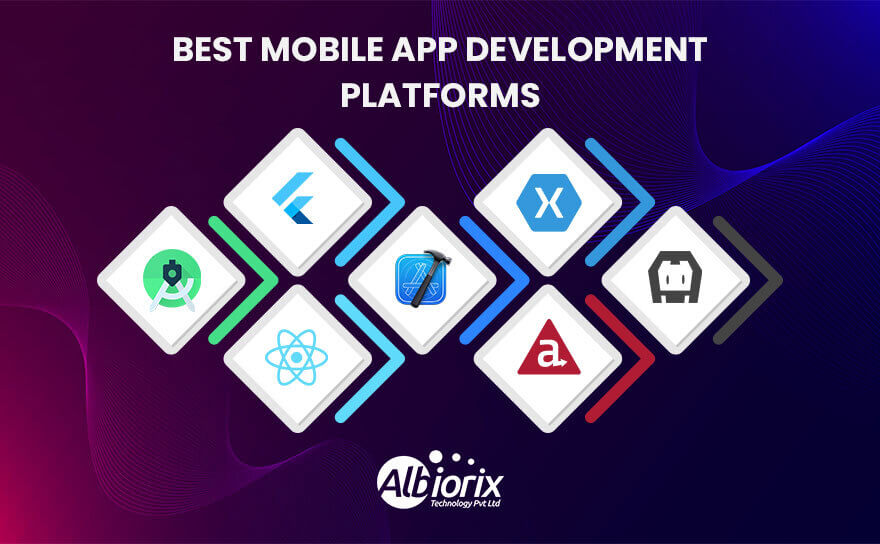
Decide whether you want to develop your app for a specific platform (iOS or Android app) or use cross-platform development frameworks (React Native, Flutter). Consider the user demographics, market share, and technical requirements of each platform.

When developing an app, choosing the right platform is a crucial decision that can significantly impact its success.

Here are some key factors to consider when selecting a platform:

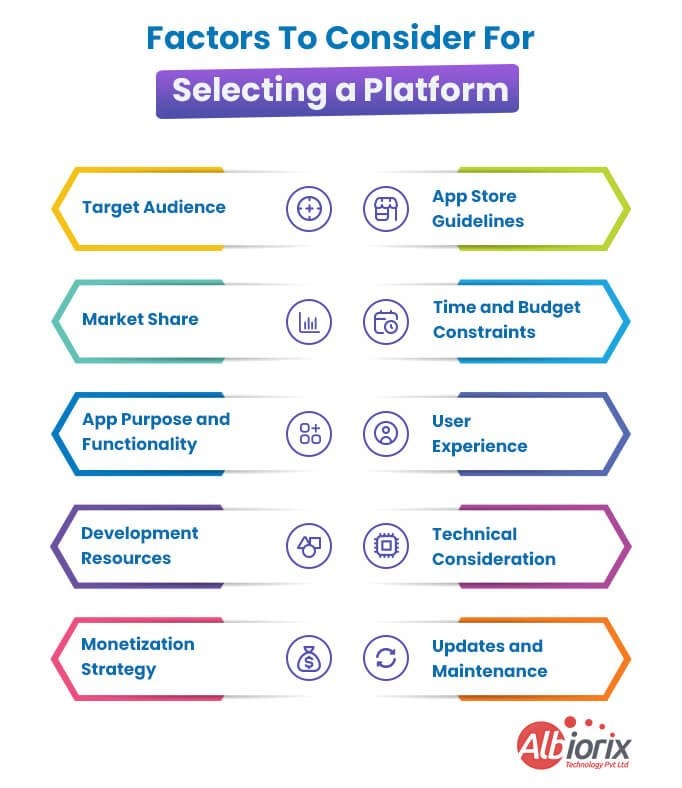
  • Target Audience: Identify your target audience and their preferred platforms. Research which platforms are most popular among your potential users. For example, if you are targeting a younger demographic, iOS and Android might be the best options, while if your app is business-oriented, you might consider developing for desktop or web platforms.
  • Market Share: Assess the market share of different platforms to determine their reach. Platforms with a larger user base can offer more potential customers for your app. Consider market and mobile app development trends and growth rates to make an informed decision.
  • App Purpose and Functionality: Determine the purpose and functionality of your app. Some platforms are better suited for specific types of apps. For instance, if your app heavily relies on AR/VR features, you might prioritize platforms with robust support for these technologies.
  • Development Resources: Evaluate the availability of development resources, tools, and frameworks for each platform. Consider the programming languages required, development environment, and available SDKs. Assess your team’s expertise and the feasibility of developing for a particular platform.
  • Monetization Strategy: Consider your app’s monetization strategy. Different platforms offer different options for generating revenue, such as in-app purchases, subscriptions, or advertising. Research the policies, restrictions, and profitability potential on each platform.
  • App Store Guidelines: Familiarize yourself with the guidelines and requirements of each platform’s app store (e.g., Apple App Store, Google Play Store). Ensure your app aligns with their guidelines and policies to avoid potential rejections or removals.
  • Time and Budget Constraints: Consider your development timeline and budget. Developing for multiple platforms simultaneously can be resource-intensive. If you have limited time or budget, it might be more practical to focus on one platform initially and expand later.
  • User Experience: Each platform has its design principles and user experience patterns. Tailor your app’s user interface and experience to match the platform’s conventions. Providing a seamless and intuitive experience will enhance user satisfaction.
  • Technical Considerations: Assess the technical requirements and limitations of each platform. Different platforms may have varying performance capabilities, hardware specifications, and integration options. Ensure your app’s features align with the platform’s technical capabilities.
  • Updates and Maintenance: Consider the platform’s update cycle and maintenance requirements. Platforms regularly release updates and new versions, which may impact your app’s compatibility and require ongoing maintenance efforts.

By considering these factors, you can make an informed decision on which platform(s) to target for your app development, maximizing its potential for success in the market.

Transform Your Business Ideas into Mobile Apps

Just share your business requirements with us as we have mobile app development experts for all your business needs.


Get Started Today!

4. Competitor analysis

Research existing mobile apps in your niche. Identify their strengths, weaknesses, and unique features. Differentiate your app by offering something new or improving upon existing mobile app development solutions.

5. App monetization strategy

Determine how you plan to generate revenue from your app. Popular monetization methods include in-app purchases, subscriptions, advertisements, or offering a paid version. Select the strategy that aligns with your target audience and app functionality.

User experience (UX) and user interface (UI) designFocus on creating a seamless and intuitive user experience. Consider the app’s layout, navigation, and visual design to make it visually appealing and user-friendly.

6. Features and functionality

Define the core features and functionalities your app will offer. Prioritize essential features and consider adding additional features based on user feedback and market demand. Keep the app simple and avoid feature overload.

Development approach Determine whether you will develop the app in-house or outsource it to a development team. Consider the resources, expertise, and budget required for each approach.

7. Technical requirements

Outline the technical specifications, such as the backend infrastructure, APIs, and third-party integrations needed to support your app’s functionality. Consider scalability, security, and data privacy aspects during this phase.

8. Development timeline and budget

Create a realistic timeline for app development, including milestones and deadlines. Estimate the development costs, including design, development, testing, and deployment expenses. Ensure you have sufficient resources to complete the project.

9. Testing and quality assurance

Plan for thorough testing to identify and fix bugs, usability issues, and performance bottlenecks. Invest in quality assurance measures to deliver a stable and reliable app.

10. App store guidelines and submission process

Familiarize yourself with the guidelines and policies of the respective app stores (Apple App Store, Google Play Store) to ensure your app meets their requirements. Understand the submission process and prepare all necessary assets for the app store listing.

11. Marketing and promotion

Develop a marketing strategy to generate awareness and attract users to your app. Utilize various channels like social media, online advertising, influencer marketing, and content marketing to reach your target audience.

12. Post-launch support and updates

Plan for ongoing maintenance and support after the app’s launch. Address user feedback, fix bugs, and release updates to enhance functionality and user satisfaction.

Remember, creating a successful app requires careful planning, attention to detail, and continuous improvement based on user feedback and market trends.

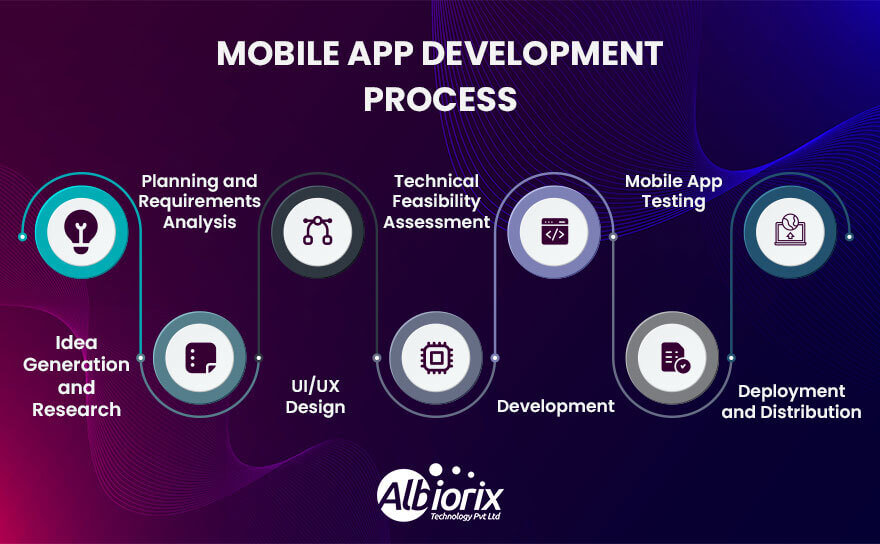
7 Easy Steps For Developing an App

Creating an app can be an exciting and rewarding process. While it may seem daunting at first, breaking it down into steps can make the process more manageable. Here are seven easy steps to create an app:

Step 1: Define your app idea

Start by clarifying your app idea and identifying its purpose. Determine the problem your app will solve or the value it will provide to users. Conduct market research to ensure there is a demand for your app and to understand your target audience.

The “Define” stage of creating an app involves conceptualizing and clarifying your app idea. It is the initial phase where you establish a clear understanding of what you want to create, define its purpose, and outline its key features and functionalities. This stage is crucial as it sets the foundation for the entire app development process.

Here are some key steps involved in the “Define” stage of creating an app:

  • Idea Generation: Identify the problem or need that your app will address. Think about the target audience and their pain points, and brainstorm ideas for how your app can provide a solution or enhance their lives.
  • Market Research: Conduct thorough research to validate your app idea and assess its market potential. Analyze similar existing apps to understand their strengths, weaknesses, and unique selling points. Identify gaps in the market that your app can fill.
  • Target Audience Definition: Determine your target audience and create user personas. Understand their demographics, behaviors, and preferences. This will help you tailor your app’s features and design to meet their specific needs and expectations.
  • Unique Value Proposition: Define the unique value your app will offer to users. Identify what sets it apart from competitors and articulate the key benefits that users will gain by using your app.
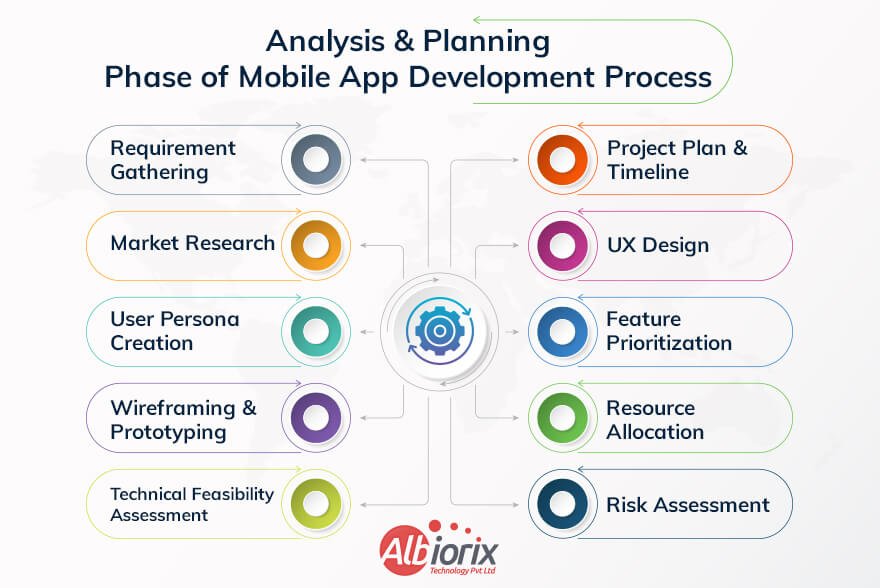
  • Feature Prioritization: Make a list of all the features and functionalities you envision for your app. Prioritize them based on their importance, feasibility, and alignment with your app’s purpose. This will help you create a minimum viable product (MVP) with essential features to launch initially.
  • User Flow and Wireframing: Create a visual representation of your app’s user interface (UI) and user experience (UX) through wireframes and user flow diagrams. These help you map out the navigation, screen layouts, and interactions within the app.
  • Technical Feasibility Assessment: Assess the technical feasibility of your app idea. Consider the required technology stack, integration possibilities with external systems or APIs, and any potential limitations or challenges that may arise during development.
  • Monetization Strategy: Determine how your app will generate revenue. Explore various monetization models such as paid downloads, in-app purchases, subscriptions, advertising, or a combination of these. Align your strategy with your target audience and the value your app provides.
  • Documentation: Document all the insights, decisions, and specifications gathered during the “Define” stage. This documentation will serve as a reference point throughout the app development process.

By investing time and effort in the “Define” stage, you lay a solid foundation for your app development journey. It helps you clarify your vision, identify your target audience, and outline the key features necessary for building a successful app.

Step 2: Plan your apps features and functionality

Create a list of features and functionalities you want your app to have. Prioritize these features based on their importance and feasibility. Consider creating a wireframe or sketch to visualize the user interface and user experience (UI/UX) of your app.

Planning your app’s features and functionality in detail is a crucial step in the app development process. It involves thoroughly mapping out what your app will do, how it will work, and what features it will offer to users.

This planning phase helps you define the scope of your app, set clear objectives, and ensure that you have a clear vision for its development.

Here are some key aspects to consider when planning your app’s features and functionality:

  • Define the purpose and target audience: Determine the primary goal of your app and identify the specific audience it aims to serve. This will help you make decisions about the features and functionality that will be most valuable to your users.
  • Research and analyze similar apps: Conduct a competitive analysis to identify other apps that are similar to yours or address similar user needs. Evaluate their features, strengths, and weaknesses. This research will provide insights and inspiration for your own app’s features and functionality.
  • Create a feature list: Make a comprehensive list of all the features you envision for your app. Start with the essential features that align with your app’s purpose and add additional features that could enhance the user experience. Prioritize these features based on their importance and feasibility.
  • User journey and flow: Visualize the user journey through your app by creating a flowchart or wireframe. This will help you understand how users will navigate and interact with your app’s features. Consider the different screens, actions, and information users will encounter at each step.
  • User stories and personas: Create user personas that represent different types of users who will engage with your app. Develop user stories that outline their needs, motivations, and behaviors. This will help you design features and functionality that cater to specific user needs and scenarios.
  • Define interactions and functionality: Determine how users will interact with each feature and define the desired functionality. Consider the inputs, outputs, and actions required for each feature. This will help you create a clear roadmap for implementing the necessary technical components.
  • Consider scalability and future updates: Think about the long-term vision for your app. Consider how it may evolve and scale in the future. Plan your features and functionality with scalability in mind to accommodate future growth and potential updates.
  • Get feedback and iterate: Once you have a detailed plan, share it with stakeholders, team members, or potential users to gather feedback. Incorporate their suggestions and iterate on your feature list and functionality plan accordingly.

By planning your app’s features and functionality in detail, you can ensure that you have a clear roadmap for development, align your team’s efforts, and create an app that meets the needs of your target audience. It sets a strong foundation for the subsequent steps of design, development, and testing.

Develop High-Performing Mobile Apps using React Native

We have a team of top-notch mobile app developers that are expert in building engaging cross-platform mobile apps that are tailored to your unique business goals.


Build Your App Now

Step 3: Design the user interface (UI)

Design the visual elements and user interface of your app. This includes creating a color scheme, selecting fonts, and designing icons and buttons.

Consider hiring a professional UI/UX designer or using design tools to ensure your app has an appealing and user-friendly interface.

Designing the user interface (UI) is a crucial stage in creating an app. The UI is the visual representation of the app that users interact with, and it plays a significant role in attracting users, engaging them, and providing a positive user experience.

Here’s an explanation of the UI design stage of creating an app:

  • Define the app’s goals and target audience: Before diving into UI design, it’s important to clearly understand the app’s goals and the target audience’s needs and preferences. This information will guide the design decisions and ensure that the UI aligns with the app’s purpose.
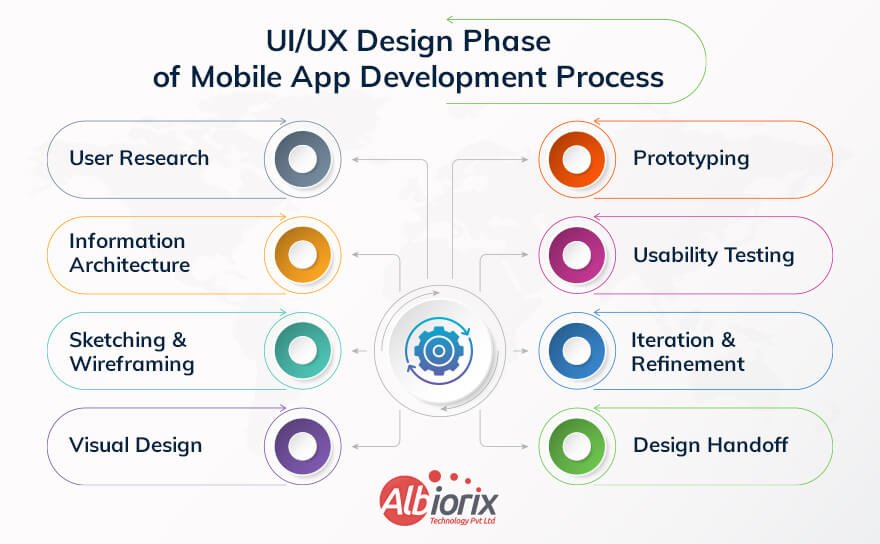
  • Conduct user research: To create a user-centered design, it’s essential to conduct user research. This involves gathering insights about the target audience, their behaviors, and their expectations from similar apps. User research helps in understanding user preferences, pain points, and usability requirements.
  • Create wireframes: Wireframes are basic, low-fidelity visual representations of the app’s screens and layout. They serve as a blueprint for the UI design, showcasing the placement of different elements, navigation flow, and overall structure of the app. Wireframes help in visualizing the app’s functionality and organizing the content effectively.
  • Develop a visual design concept: Once the wireframes are in place, it’s time to create a visual design concept. This involves selecting an appropriate color scheme, typography, and visual style that aligns with the app’s branding and target audience. The visual design should create a visually appealing and cohesive experience for users.
  • Create mockups: Mockups are high-fidelity representations of the app’s screens that provide a more detailed and realistic view of the UI. They include refined visual design elements, such as icons, images, and interactive elements. Mockups help stakeholders and developers visualize the final product and make informed decisions about the UI elements and aesthetics.
  • Consider usability and accessibility: During the UI design process, it’s crucial to ensure usability and accessibility. Usability focuses on creating an intuitive and user-friendly interface, while accessibility ensures that the app can be used by people with disabilities or special needs. This involves designing clear navigation, using standard interface patterns, and adhering to accessibility guidelines.
  • Iterate and gather feedback: UI design is an iterative process. It’s important to gather feedback from stakeholders, users, or usability testing sessions and make necessary improvements. Iterations help refine the UI design, address any usability issues, and align the interface with the users’ expectations.
  • Prepare design assets for development: Once the UI design is finalized, the design assets, including graphical elements and specifications, need to be prepared for development. This involves exporting assets in the appropriate file formats and creating style guides or design documentation to provide guidance to the development team.

Overall, the UI design stage involves understanding the app’s goals and target audience, conducting research, creating wireframes and mockups, refining the visual design, considering usability and accessibility, iterating based on feedback, and preparing design assets for development. A well-designed UI enhances the overall user experience and contributes to the success of the app.

Step 4: Develop your app

This step involves coding and programming your app. Decide whether you want to develop a native app (specific to a platform like iOS or Android) or a cross-platform app (compatible with multiple platforms).

Choose the appropriate programming language and development framework based on your chosen platform(s). If you’re not a developer yourself, consider hiring one or outsourcing the development work.

The app development phase is a crucial stage in the creation of a mobile application. It involves transforming an idea or concept into a functional and user-friendly app that can be deployed on various platforms, such as iOS and Android.

Here are the key steps involved in the app development phase:

  • Planning and Ideation: This initial stage involves brainstorming and conceptualizing the app idea. It includes defining the purpose, target audience, and goals of the app. Research is conducted to assess market demand, competition, and potential features that should be included.
  • Requirement Gathering: In this phase, mobile app developers work closely with stakeholders to gather detailed requirements for the app. This includes identifying the essential features, user interactions, and any specific technical requirements. Creating user personas and use cases can help in understanding the user’s perspective and guiding the development process.
  • Designing the User Interface (UI) and User Experience (UX): UI and UX design play a crucial role in the success of an app. The UI design focuses on creating visually appealing and intuitive interfaces, while the UX design ensures a smooth and satisfying user experience. Wireframing and prototyping tools are often used to create mockups and test different design elements.
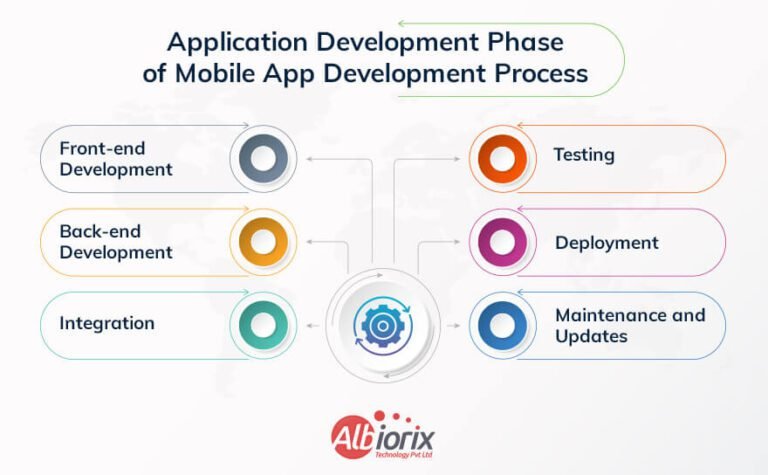
  • Backend Development: This stage involves setting up the backend infrastructure that powers the app. It includes developing the server-side components, managing databases, integrating APIs (Application Programming Interfaces), and implementing server logic. Backend development ensures that the app can handle data storage, retrieval, and processing efficiently.
  • Frontend Development: Frontend development involves implementing the visual elements and user interactions of the app. Using programming languages such as Swift (for iOS) or Java/Kotlin (for Android), developers write the code that enables the app to run on the target platform. They incorporate the UI/UX design, handle user input, and connect with the backend systems.
  • Testing and Quality Assurance: Thorough testing is crucial to identify and fix any bugs, glitches, or usability issues. Different types of testing, including functional testing, usability testing, performance testing, and security testing, are conducted to ensure the app works as intended and delivers a seamless user experience across different devices and platforms.
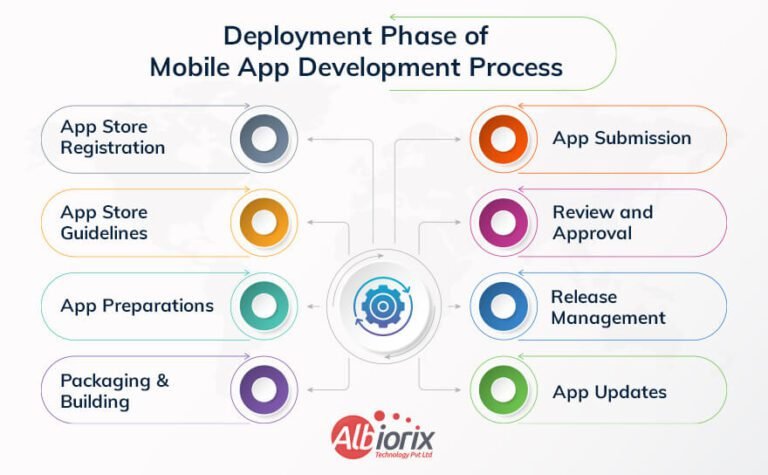
  • Deployment and Distribution: Once the app passes testing and quality assurance, it is ready for deployment. For iOS, it needs to go through Apple’s App Store review process, where it is evaluated for compliance with guidelines and policies. Android apps are typically deployed on the Google Play Store. Developers working with the best mobile app development company need to create developer accounts, prepare app assets (such as icons and screenshots), and follow the respective app store’s submission process.
  • Maintenance and Updates: After the app is launched, ongoing maintenance and updates are necessary to keep it functioning optimally. This involves monitoring user feedback, addressing reported issues, optimizing performance, and releasing new features or improvements based on user needs and market trends. Regular updates ensure that the app remains relevant and competitive in the ever-evolving app landscape.

Throughout the app development phase, collaboration among various stakeholders, including developers, designers, product managers, and testers, is vital to ensure a successful app that meets the expectations of both the target audience and the client.

Step 5: Test your app

Thoroughly test your app to identify and fix any bugs or issues. Use emulators, simulators, or real devices to test your app’s functionality and ensure it works as intended. Conduct user testing to gather feedback and make necessary improvements to enhance the user experience.

The app testing phase is a crucial part of the mobile app development process that ensures the quality and functionality of the application before it is released to users. This phase involves systematically evaluating various aspects of the app to identify and fix any bugs, errors, or usability issues.

Let’s break down the app testing phase into key steps:

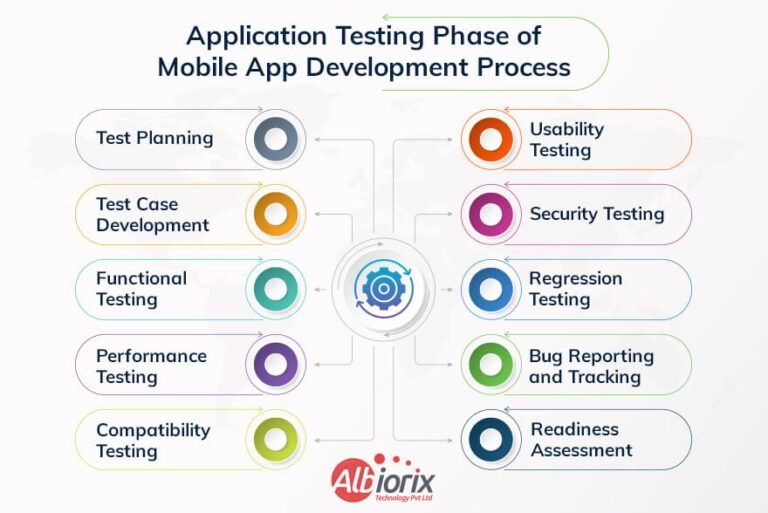
  • Test Planning: This initial stage involves defining the scope and objectives of the testing process. It includes determining the types of testing required, such as functional testing, performance testing, security testing, and usability testing. Test planning also involves creating test cases, test scenarios, and defining the test environment.
  • Test Design: In this phase, the test cases and test scenarios are designed based on the requirements and functionality of the app. Testers create a comprehensive test plan that covers different scenarios and user interactions. The test design phase focuses on creating a structured approach to cover all the app’s features and ensure maximum test coverage.
  • Test Execution: During this stage, the actual testing is performed. Testers execute the test cases and test scenarios that were designed in the previous phase. They interact with the app, input various data, and observe the app’s behavior. Testers verify if the app functions as intended, identifies any defects, and records them for further analysis.
  • Defect Reporting and Tracking: Whenever a bug or defect is identified during the test execution phase, it is reported to the development team. Testers provide detailed information about the issue, including steps to reproduce it, expected behavior, and actual behavior. A bug tracking system or an issue management tool is often used to track the reported defects and monitor their resolution.
  • Defect Fixing and Retesting: Once the development team receives the defect reports, they analyze and prioritize the issues. They then work on fixing the identified bugs and issues. After the fixes are implemented, the app goes through regression testing, where previously tested functionalities are retested to ensure that the fixes did not introduce new issues.
  • User Acceptance Testing (UAT): User acceptance testing involves testing the app with a group of end-users or stakeholders to validate its usability, performance, and overall satisfaction. This phase helps gather feedback from real users and ensures the app meets their expectations.
  • Performance Testing: Performance testing evaluates the app’s speed, responsiveness, stability, and scalability under various conditions, such as high user loads or network fluctuations. It helps ensure that the app performs well in real-world scenarios.
  • Security Testing: Security testing focuses on identifying vulnerabilities and weaknesses in the app’s security measures. It involves testing for potential breaches, data leaks, unauthorized access, and other security risks. This step is crucial to protect user data and ensure the app’s overall security.
  • Usability Testing: Usability testing assesses how easily users can navigate and interact with the app. Testers evaluate the app’s user interface, intuitiveness, and overall user experience. This testing phase helps identify any usability issues and suggests improvements to enhance user satisfaction.
  • Final Approval and Release: Once all the necessary tests have been conducted, and the identified issues have been fixed, the app is ready for final approval. The stakeholders and the development team review the test results, and if the app meets the predefined criteria and quality standards, it is released to the intended audience through app stores or other distribution channels.

Overall, the app testing phase ensures that the developed app is thoroughly evaluated, any defects are identified and resolved, and the final product meets the quality standards and user expectations. It helps deliver a reliable, functional, and user-friendly application to the market.

Step 6: Publish your app

Prepare your app for distribution by creating developer accounts on relevant app stores (e.g., Apple App Store, Google Play Store).

Publishing an app involves the process of making your application available for users to download and use on their devices. The specific steps may vary depending on the platform you are targeting (e.g., iOS, Android, web)

Here is a general overview of the app publishing process:

  • Develop your app: Create your app by designing the user interface, implementing functionality, and testing it thoroughly to ensure it works properly.
  • Prepare assets and metadata: Prepare all the necessary assets and metadata required for the app store listing. This includes creating app icons, screenshots, promotional graphics, and writing descriptions, keywords, and other relevant information about your app.
  • Create developer accounts: Register for developer accounts with the respective app stores you want to publish your app on. For iOS, you’ll need to join the Apple Developer Program, while for Android, you’ll need to sign up as a developer on the Google Play Console. These accounts may involve a registration fee.
  • App Store guidelines and policies: Familiarize yourself with the guidelines and policies set by the app stores you’re targeting. Ensure that your app meets their requirements and follows their rules regarding content, functionality, user experience, and security.
  • Build and package the app: Build your app for the target platform and create a package or bundle file. For iOS, this could be an IPA (iOS App Store Package) file, and for Android, it would be an APK (Android Package) file.
  • Perform testing and debugging: Test your app thoroughly on various devices and platforms to identify and fix any bugs or issues. It’s essential to provide users with a stable and reliable experience.
  • App Store submission: Submit your app to the respective app stores for review. This typically involves uploading your app package, filling out information about your app, and selecting pricing and distribution options.
  • App review process: Each app store has a review process to ensure that apps meet their quality standards and policies. The review process may take some time, ranging from a few days to a couple of weeks. During this time, the app store will evaluate your app’s functionality, performance, content, and adherence to their guidelines.
  • App store approval: Once your app passes the review process, it will be approved for publication, and it will become available in the app store for users to download and install.
  • Post-launch maintenance: After your app is published, it’s crucial to monitor user feedback, fix any issues that arise, and release updates to enhance your app’s functionality and address user needs.

Remember, the app publishing process can be more complex and involve additional steps depending on the platform and specific requirements. It’s essential to consult the documentation and guidelines provided by the respective app stores to ensure a smooth publishing experience.

Step 7: Market and maintain your app

Once your app is live, create a marketing plan to promote it and attract users. Utilize various marketing channels such as social media, content marketing, and app store optimization to increase visibility and downloads.

Regularly update your app with new features, bug fixes, and performance improvements to provide a great user experience and maintain user engagement.

Remember that creating an app is an iterative process, and continuous improvement is essential. Stay updated with user feedback, monitor analytics, and be prepared to make necessary updates and enhancements to keep your app relevant and successful.

Conclusion

I hope you got a clear vision on creating an application from scratch for your business needs. You just need to take care of your business requirements, features you need to add to your app, and you’re good to go with the business app solutions.

Still, if you find any challenges in creating an app or need consultation for your business app development, contact Albiorix. We are among top-rated mobile app development agency around Australia having a team of talented mobile app developers that help you build robust mobile apps for your business needs.

A Step-by-Step Guide on Mobile App Development Process

Nowadays, mobile applications have become an integral part of our daily lives, empowering businesses and individuals alike.

Whether you’re an aspiring app developer or a business owner looking to venture into the mobile app market, understanding the development process is crucial for success.

Developing a mobile app involves a series of well-defined steps that require careful planning, design, and execution.

In this step-by-step guide, we will walk you through the entire journey, from ideation to deployment, providing you with invaluable insights and practical tips along the way-just like a professional software development company would when crafting high-quality mobile solutions.

The number of apps is increasing daily in the market, and numbers are multiplying daily. The recent survey showed that by 2026 mobile apps are projected to generate $233 billion in revenue.

Key Takeaways

  • The article discusses the mobile app development process and its various stages.
  • It emphasizes the importance of planning and strategizing before starting the development.
  • The first stage is ideation, where the app concept is defined, and target audience and goals are identified.
  • The next stage involves market research and competitor analysis to gain insights and refine the app concept.
  • The article highlights the significance of creating wireframes and prototypes to visualize the app’s structure and functionality.
  • Designing the user interface (UI) and user experience (UX) is a crucial step to ensure a seamless and engaging app experience.
  • The development stage involves coding and programming the app, using technologies like Swift, Kotlin, or React Native.
  • Quality assurance and testing are essential to identify and fix bugs, ensure compatibility, and optimize app performance.
  • The deployment stage includes submitting the app to app stores and making it available for download.
  • Ongoing maintenance, updates, and support are necessary to keep the app functioning well and address user feedback.
  • The article highlights the need for a well-defined mobile app development process to ensure efficiency, quality, and a successful end product.

What is the Mobile App Development Process?

The mobile app development process is a structured approach used to create a mobile application from start to finish.

A mobile app development company typically follows steps like planning, design, development, testing, deployment, and post-launch maintenance.

During development, the focus is on creating an app that meets desired functionality and provides a positive user experience.

The app must be compatible with target platforms, including iOS and Android application development. Each step ensures that the app is developed efficiently and effectively, offering the best performance across devices.

Transform Your Business Vision into a Stunning Mobile App Today!

Our mobile app development experts are proficient in dealing with leading tech stacks for building responsive mobile apps.

Contact Us Now

7 Essential Steps of Mobile App Development Process

Let’s explore the 7 easy steps of the mobile app development process to design and build mobile apps smoothly.

1. Strategy Development

The strategy phase of mobile app development is a crucial stage that sets the foundation for the entire mobile app project.

The mobile app development strategy involves defining the objectives, identifying the target audience, conducting market research, and developing a comprehensive plan for the mobile app development lifecycle and deployment.

Strategy Phase of Mobile App Development Process

Let’s Dive Into the Key Aspects of The Mobile App Development Strategy Phase in Detail:

  • Conceptualization: This initial development stage involves brainstorming and conceptualizing the mobile app idea. It includes identifying the problem the app aims to solve or the need it fulfills. The app’s unique selling points (USPs) and features are defined, keeping in mind the target audience and market demand.
  • Market Research: Conducting thorough market research is essential to understand the competitive landscape, target audience preferences, and app development industry trends. This involves analyzing similar apps in the market, studying their features, strengths, and weaknesses, and identifying any gaps or opportunities for your app.
  • Define Objectives and Key Performance Indicators (KPIs): Clearly defining the objectives and goals for the mobile application is vital. These objectives can include increasing user engagement, generating revenue through in-app purchases or advertisements, or expanding the user base. Additionally, establishing measurable KPIs helps track the performance and app’s success against the set objectives.
  • Target Audience Analysis: Identifying and understanding the target audience is crucial for designing an app that caters to their needs and preferences. Conduct user research, create user personas, and analyze user behavior to gain insights into their demographics, motivations, pain points, and usage patterns. This information helps in tailoring the app’s features, mobile app design process, and user experience accordingly.
  • Platform Selection: Determine the target multiple mobile analytics platforms for your app, such as iOS, Android, or both. Consider factors like the target audience’s device preferences, market share, Cost To Make an App, and desired features when choosing the platforms. Each platform has its own development requirements, app’s design guidelines, and technical considerations.
  • Monetization Strategy: Decide on the monetization model for your app. There are various options to generate revenue, including in-app purchases, subscriptions, advertisements, or a combination of these. Assess the feasibility and profitability of each model based on the app’s niche, target audience, and market trends.
  • Technical Feasibility Assessment: Evaluate the technical feasibility of your app idea. Consider factors such as the complexity of the app’s features, required integrations (e.g., with APIs or external services), potential scalability challenges, and compatibility with different new mobile devices and operating systems. This assessment helps identify any technical limitations or obstacles that need to be addressed during the development process.
  • Wireframing and Prototyping: Create wireframes or mockups of the app’s user interface (UI) and user experience (UX). This visual representation allows you to refine the mobile app design, layout, and navigation flow before investing in full-scale development. Prototyping helps validate the app’s features and gather feedback from stakeholders or potential working app users.
  • Development Plan: Develop a detailed plan outlining the development milestones, timeline, resource allocation, and dependencies. This plan should consider the complexity of the app, the team’s capabilities, and any external factors that may impact the development process. It helps ensure efficient project management and timely delivery.
  • Budgeting: Estimate the development costs based on the app’s requirements, features, platform selection, and the resources involved. Consider development, design, quality assurance, hosting, maintenance, and marketing costs. Accurate budgeting enables better financial planning and resource allocation throughout the app development lifecycle.
  • User Acquisition and Marketing Strategy: Outline a comprehensive marketing and user acquisition strategy to promote the app and maximize its visibility and downloads. This may include app store optimization (ASO), social media campaigns, content marketing, influencer partnerships, and paid advertisements. Plan for ongoing user engagement and retention.

2. Analysis and Planning

The analysis and planning phase is an essential stage in the mobile app development process. It involves gathering information, defining requirements, and creating a strategic plan for the development of a mobile application.

This phase sets the foundation for the entire development process and ensures that the resulting app aligns with the client’s vision and objectives.

Planning Phase of Mobile App Development Process

Here are the key steps involved in the analysis and planning phase of mobile app development:

  • Requirement Gathering: This mobile app development step involves extensive discussions with the client to understand their goals, target audience, desired features, and functionality requirements for the mobile app. It is crucial to gather comprehensive information to ensure that the app meets the client’s expectations.
  • Market Research: Conducting market research helps identify the target market, potential competitors, and industry trends. This information enables the development team to understand user preferences, analyze existing apps, and determine the unique selling points of the app being developed.
  • User Persona Creation: User personas represent the target users of the app. They are fictional characters created based on demographic data, behavior patterns, and user goals. User personas help the development team understand the needs and expectations of the app’s target audience, enabling them to make an app’s design a user-friendly and engaging experience.
  • Wireframing and Prototyping: Wireframing involves creating low-fidelity visual representations of the app’s screens and features. It helps in establishing the app’s structure, navigation flow, and placement of elements. Prototyping involves creating interactive mockups or clickable prototypes that simulate the app’s functionality, allowing stakeholders to visualize and validate the design concept.
  • Technical Feasibility Assessment: In this step, the development team evaluates the technical feasibility of the proposed app. They consider factors such as platform compatibility (iOS or Android app), device capabilities, integration requirements, and any specific technology constraints. This assessment helps identify potential challenges and define the most suitable development approach.
  • Project Plan and Timeline: Once the requirements and technical feasibility are understood, a project plan is created. This plan outlines the development phases, milestones, resource allocation, and estimated timelines for each task. It provides a roadmap for the development team and ensures that the project stays on track.
  • User Experience (UX) Design: UX design focuses on creating a seamless and intuitive user experience. The design team translates the wireframes into high-fidelity visual designs, considering aspects such as branding, color schemes, typography, and user interactions. UX design aims to enhance usability, accessibility, and overall user satisfaction.
  • Feature Prioritization and MVP Definition: Based on the project scope and timeline, it is essential to prioritize the app features. The team identifies the app development basics that must be included in the Minimum Viable Product (MVP), which is the initial version of the app with essential features. This approach allows for quicker development and iterative enhancements in subsequent versions.
  • Resource Allocation: The development team identifies the necessary resources, including developers, designers, testers, and other specialists required for the project. Resource allocation ensures that the team has the required skills and capacity to execute the development plan effectively.
  • Risk Assessment: Potential risks and challenges are identified and assessed during this phase. It helps in developing risk mitigation strategies and contingency plans to address issues that may arise during the development process.

By completing the analysis and planning phase thoroughly, the development team gains a clear understanding of the client’s requirements, target market, technical feasibility, and project constraints.

This knowledge forms the foundation for the subsequent phases of mobile application development, including design, development, testing, and deployment.

Take Your Online Business to New Heights With Custom App

Ready to elevate your app apps? Choose our mobile app development solutions for seamless app solutions.

Reach out today!

3. UI/UX Design

The UI/UX (User Interface/User Experience) design stage is a crucial phase in the mobile application development process.

It involves creating the visual and interactive elements of the app, with a focus on enhancing the user’s satisfaction and overall experience.

UI/UX Design Phase of Mobile App Development Process

Here’s a breakdown of the UI/UX design stage:

  • User Research: The process begins with understanding the target audience, their needs, preferences, and behaviors. This research helps in creating user personas and defining user stories, which act as guidelines throughout the design process.
  • Information Architecture: This step involves structuring and organizing the app’s content and features. It includes creating wireframes and flowcharts to plan the navigation and overall hierarchy of information within the app. The goal is to ensure a logical and intuitive user experience.
  • Sketching and Wireframing: Designers sketch out rough layouts and create low-fidelity wireframes to outline the visual structure and placement of elements. Wireframes help in visualizing the app’s layout, interactions, and user flow without getting into detailed design aspects.
  • Visual Design: Once the wireframes are approved, the visual design phase begins. This involves selecting appropriate colors, typography, icons, and visual elements that align with the app’s branding and target audience. Designers create high-fidelity mockups using design tools like Sketch, Figma, or Adobe XD, giving a realistic representation of the app’s final look.
  • Prototyping: Prototyping brings the app to life by adding interactive elements and animations to the static design. Interactive prototypes allow designers and stakeholders to test and validate the user experience, identify any usability issues, and make necessary adjustments before moving to development.
  • Usability Testing: User testing plays a crucial role in validating the design decisions. Test users are given tasks to perform within the app, and their feedback and behavior are observed and analyzed. Usability testing helps identify pain points, confusing elements, and areas for improvement, allowing designers to refine the user experience further.
  • Iteration and Refinement: Based on the feedback received from usability testing, the design is refined and iterated upon. This process may involve making changes to the layout, navigation, visual elements, or interactions to address any identified issues and improve overall usability.
  • Design Handoff: Once the UI/UX design is finalized, it is handed off to the development team. Designers provide developers with design specifications, style guides, and any necessary graphical assets to ensure accurate implementation.

Related Post: Mobile App Development Frameworks

It’s important to note that the UI/UX design stage is an iterative process, and collaboration between designers, developers, and stakeholders is crucial for successful outcomes.

Continuous feedback, testing, and refinement help mobile app developers create a mobile app that not only looks visually appealing but also provides an intuitive and enjoyable user experience.

4. App Development

The app development phase is a crucial step in the mobile app development process. It involves transforming the app concept and design into a fully functional mobile application.

Application Development Phase of Mobile App Development Process

Here are the key steps typically involved in the app development phase:

  • Front-end Development: This step involves developing the user interface (UI) of the mobile app. It includes creating the app screens, designing the layout, and implementing the user interactions. Front-end development may require coding in programming languages such as Swift for iOS apps or Java/Kotlin for Android apps.
  • Back-end Development: In this step, the server-side components of the mobile app are developed. It involves building the server infrastructure, creating APIs (Application Programming Interfaces) for data exchange between the app and server, and implementing any necessary databases or storage systems. Back-end development can be done using languages like Node.js, Python, or Ruby on Rails.
  • Integration: Integration is the process of connecting the app with various third-party services or APIs, such as payment gateways, social media platforms, location services, or cloud storage providers. Integration ensures that the app can leverage external functionalities to enhance its features and capabilities.
  • Testing: Testing is a critical phase to identify and fix any bugs, errors, or usability issues within the mobile app. Different types of mobile app testing are performed, including functional testing, usability testing, performance testing, and security testing. This step of mobile application development ensures that the app functions as intended and provides a smooth user experience.
  • Deployment: Once the app has been thoroughly tested and deemed ready for release, it is deployed to the respective application stores, such as the Apple App Store or Google Play Store. The app is packaged, signed, and submitted following the guidelines and requirements of the app store platforms.
  • Maintenance and Updates: After the app is launched, ongoing maintenance and updates are required to address user feedback, fix bugs, improve performance, and introduce new features. This phase of mobile app development involves monitoring app analytics, collecting user feedback, and releasing regular updates to keep the app up-to-date and relevant.

Throughout the app development phase, collaboration between developers, designers, and other stakeholders is essential to ensure the app meets the defined requirements and aligns with the intended vision.

Project management techniques and tools are often used to track progress, manage tasks, and facilitate effective communication among team members.

Boost Customer Engagement and Increase Revenue with a Cutting-Edge Mobile App.

We help you build and design mobile apps using the latest trending technologies for your business needs.

Book Consultation Now!

5. Application Testing

The application testing stage is a crucial part of the mobile app development process.

It involves thoroughly evaluating the app’s functionality, performance, and usability to ensure that it meets the intended requirements and delivers a high-quality user experience.

Here are the key steps involved in the mobile application testing stage of mobile app test-driven development:

  • Test Planning: The first step is to create a comprehensive test plan that outlines the testing objectives, scope, testing techniques, and the mobile devices and platforms to be tested. The test plan serves as a roadmap for the testing activities and helps in organizing the process effectively.
  • Test Case Development: Test cases are specific scenarios or conditions that need to be tested to validate the app’s features and functionality. Testers create test cases that cover various aspects of the app, including user interactions, input validations, data handling, and error handling. Each test case includes step-by-step instructions and expected results.
  • Functional Testing: This type of testing focuses on verifying whether the app functions correctly according to its specifications. Testers execute the test cases to validate features such as navigation, user interface, data processing, and integration with external services or APIs.
  • Performance Testing: Performance testing assesses the app’s responsiveness, stability, and resource usage under different load conditions. Testers simulate various scenarios, such as high user traffic or low network connectivity, to identify performance bottlenecks, memory leaks, and any other issues that could affect the application’s performance.
  • Compatibility Testing: Mobile apps need to be compatible with a wide range of devices, mobile operating systems, and screen sizes. Compatibility testing ensures that the app works seamlessly across different devices, platforms (e.g., iOS and Android), and versions. Testers verify that the layout of native mobile apps, functionality, and user experience remain consistent across various configurations.
  • Usability Testing: Usability testing evaluates the app’s user-friendliness and effectiveness in meeting users’ needs. Testers assess factors such as app navigation, intuitiveness, ease of use, visual appeal, and overall user experience. Feedback from real users can be collected through surveys, interviews, or observation sessions to gain valuable insights.
  • Security Testing: Mobile apps handle sensitive user data, making security testing essential. Testers identify potential vulnerabilities, such as data leakage, unauthorized access, or insecure data storage, and perform penetration testing to ensure the app’s security measures are robust.
  • Regression Testing: Whenever changes are made to the app, regression testing is performed to verify that the existing functionalities are not affected. Testers retest previously tested features to ensure they continue to work correctly, while also checking for any unintended side effects caused by new updates.
  • Bug Reporting and Tracking: Throughout the testing phase, testers document any issues, defects, or bugs encountered during their tests. They provide detailed reports with steps to reproduce the problem and other relevant information. Mobile app developers then address these issues, and the bug tracking system helps track the progress and resolution of each reported bug.
  • User Acceptance Testing (UAT): UAT involves engaging real end-users to test the app in a real-world environment. Users provide feedback on the app’s usability, functionality, and overall satisfaction. This testing phase helps identify any additional improvements or issues that might have been missed during internal testing.
  • Deployment Readiness Assessment: Before releasing the app, a final assessment is conducted to ensure it meets all the predefined quality standards and requirements. The assessment includes reviewing test results, bug fixes, user feedback, and ensuring that the app is stable, secure, and ready for deployment.

By following these steps and conducting rigorous testing, the mobile app development team can identify and rectify issues, thereby ensuring a high-quality app that provides an optimal user experience.

Related Post: Comprehensive Guide on Outsourcing App Development

6. Deployment

The deployment phase is an important step in the mobile app development process where you make your app available to users for download and use.

Deployment Phase of Mobile App Development Process

Here’s an overview of the deployment phase:

  • App Store Registration: If you’re targeting iOS apps or devices, you need to register as an Apple Developer and obtain a developer account. This enables you to submit your app to the Apple App Store. For Android devices, you’ll need a Google Play Developer account to submit your app to the Google Play Store.
  • App Store Guidelines: Familiarize yourself with the guidelines and policies of the respective app stores. Ensure your app complies with these guidelines to prevent rejections during the submission process.
  • App Preparations: Before submission, ensure your app is thoroughly tested and free from major bugs. Optimize its performance, fix any crashes, and address any user interface issues. You should also consider providing localized versions of your app if you plan to target users in different countries or regions.
  • Packaging and Building: Create a final build of your app that is suitable for deployment. This involves compiling your source code, generating executable files, and creating the necessary assets, such as icons and launch screens.
  • App Submission: Once your app is packaged, you can submit it to the respective application stores. Each app store has its submission process and guidelines. You’ll need to provide information such as app descriptions, screenshots, keywords, and categorization.
  • Review and Approval: The app stores review your submission to ensure it meets their guidelines and policies. This process can take several days or even weeks, depending on the platform and the complexity of your app. Be prepared to address any issues or requests from the app store reviewers during this phase.
  • Release Management: Once your app is approved, you can set its release date and decide whether to release it immediately or schedule it for a specific time. Some app stores also offer options for phased rollouts, allowing you to release your app to a subset of app users initially.
  • App Updates: After your app is deployed, you may need to release updates to address bug fixes, introduce new features, or improve performance. It’s important to have a process in place to handle future updates and ensure a smooth user experience.

Remember that the deployment phase is not the end of the development process. You should continue to monitor user feedback, address any issues that arise, and iterate on your app to provide an enhanced experience for your users.

Related Post: Mobile App Development Guide 2026

7. Support and Performance Monitoring

The Support and Performance Monitoring stage is an essential part of the mobile app development process.

For developing an app, it requires ongoing support and monitoring to ensure its smooth operation, address user issues, and optimize its performance.

Performance Monitoring Phase of Mobile App Development Process

Here are the key aspects of this stage:

  • User Support: This involves providing customer support to address user queries, issues, and complaints. It can be done through various channels such as email, live chat, or a dedicated support portal. Prompt and effective support helps in maintaining user satisfaction and loyalty.
  • Bug Fixes and Updates: As users start using the app, they may encounter bugs or experience usability issues. The development team needs to identify and fix these bugs through regular updates and patches. This ensures that the app remains stable, secure, and provides a good user experience.
  • Performance Monitoring: Monitoring the performance of the app is crucial to identify bottlenecks, crashes, or slow response times. Various analytics tools and crash reporting frameworks can be utilized to collect data on app usage, performance metrics, and user behavior. This data helps in identifying areas for improvement and optimizing the app’s performance.
  • App Analytics: Collecting and analyzing app usage data provides insights into user behavior, preferences, and engagement patterns. Analytics tools enable tracking key metrics like active users, retention rates, conversion rates, and user flows. These insights help in making data-driven decisions for further app enhancements and marketing strategies.
  • Security and Compliance: App security is an ongoing concern, and it’s essential to monitor the app for potential vulnerabilities and stay up to date with security patches and updates. Compliance with data protection regulations, such as GDPR or CCPA, should also be ensured during this stage.
  • Feature Enhancements: Based on user feedback and analytics data, new features or improvements can be planned and implemented. Regular updates keep the app fresh, competitive, and aligned with user expectations.
  • Performance Optimization: Continuous performance optimization is necessary to enhance app speed, responsiveness, and resource usage. This includes optimizing code, minimizing network requests, reducing memory consumption, and improving battery efficiency.
  • Compatibility Testing: Mobile devices and operating systems evolve rapidly. Regular compatibility testing ensures that the app remains compatible with the latest device models, OS, and screen resolutions.

Overall, the Support and Performance Monitoring stage ensures that the app remains reliable, user-friendly, and performs well throughout its mobile app development cycle.

It involves continuous monitoring, bug fixing, user support, data analysis, security updates, and regular enhancements to keep the app relevant and successful.

Ready to bring your app idea to life? Contact us for a free consultation!

We have a strong expertise in designing and building SPAs using ReactJS framework for all business verticals.

Contact Us

Conclusion

The mobile app development process is a multifaceted journey that requires careful planning, diligent execution, and continuous adaptation.

From the initial key stages of market research and idea validation to the final steps of deployment and maintenance, each phase plays a vital role in creating a successful app that meets user needs and stands out in a competitive landscape.

Developing mobile apps for your business requires an expert app development company that follows every phase of the app development process.

Albiorix app developers understand each process phase and deliver the app as per client needs. You can contact us to get the best services from our mobile app development team to meet your business goals.

A Complete Better Mobile App Development Business Guide

Creating a mobile app may seem complex, but with the right steps, anyone can start. First, decide what your app will do—whether it’s for fun, business, or daily tasks.

Next, choose a platform like Android or iOS. Then, select a programming language such as Java, Kotlin, or Swift. You’ll also need development tools like Android Studio or Xcode.

Good app design is important. Focus on user experience (UX) and user interface (UI) so the app is easy to use and looks clean.

Testing your app before launch ensures everything works smoothly. With practice and the right resources, mobile app development becomes a rewarding skill that helps you bring your ideas to life.

Key Takeaways

  • The article highlights the importance of mobile apps in today’s digital landscape and how they have become integral for businesses to engage with their customers effectively.
  • You need to perform careful planning and strategy before embarking on a mobile app development project.
  • We will discuss in detail about various platforms available for mobile app development, such as iOS and Android, and emphasizes the importance of choosing the right platform based on the target audience and business objectives.
  • It delves into the key considerations for designing a user-friendly and intuitive mobile app interface, including responsiveness, ease of navigation, and visual aesthetics.
  • The article highlights the significance of incorporating essential features and functionalities into the app, such as push notifications, social media integration, and in-app purchases, to enhance user engagement and drive business growth.

What is Mobile App Development?

Mobile app development is the process of making software applications that run on mobile devices like smartphones, tablets, and smartwatches. These apps are built for operating systems such as iOS and Android.

The process includes several steps—planning the idea, designing how the app will look and work, writing the code, testing it to fix any issues, and finally launching it for users.

Developers also need to maintain and update the app regularly. Good mobile app development focuses on creating apps that are easy to use, work well on different devices, and provide a smooth user experience.

Primary Approaches of Mobile App Development

Mobile app development can be divided into two main categories: native app development and cross-platform app development.

Native App Development

Native app development is the process of building mobile applications specifically for one operating system, like iOS or Android. For example, developers use Swift or Objective-C to build iOS apps and Java or Kotlin for Android apps.

Since native apps are designed for a particular platform, they can use the device’s full features like camera, GPS, and notifications. This makes the app faster, smoother, and more reliable for users.

Working with a trusted mobile app development company can help ensure your app meets platform standards and offers a great user experience. Native apps follow the design rules of their platform, making them look and feel natural to users.

Choosing native app development is ideal if performance, speed, and quality are top priorities for your mobile app. It may take more time and effort, but it often leads to better results for both businesses and users.

Advantages of Native App Development

  • Performance: Native apps are optimized for the specific platform, resulting in faster performance and smoother user interactions compared to other types of apps.
  • Access to platform features: Native development allows direct access to platform-specific features, such as camera, GPS, contacts, and notifications, enabling developers to create richer and more integrated app experiences.
  • User experience: Native apps can provide a seamless and intuitive user experience, as they are designed according to the platform’s UI guidelines, ensuring familiarity and consistency for mobile app users.
  • Offline capabilities: Native apps can store data locally, allowing users to access certain features and content even without an internet connection.

However, native app development also has some challenges:

  • Development time and cost: Building separate native apps for multiple platforms (e.g., Android and iOS) can require additional time and resources compared to cross-platform development approaches.
  • Maintenance: As each platform requires its own codebase, maintaining and updating native apps for multiple platforms can be more complex and time-consuming.
  • Learning curve: Developing native apps often requires platform-specific knowledge and programming languages, which may require developers to learn and adapt to different technologies.
  • Limited reach: Native apps are platform-specific, meaning they can only run on the operating system they were developed for. This can limit the potential audience and reach of the application.

Despite these challenges, native app development remains a popular choice for building mobile apps that are high-performance and feature-rich applications that deliver an optimal user experience on specific platforms.

Native apps have the advantage of being able to access all the features and capabilities of the underlying operating system, resulting in high performance and seamless integration with the device.

Develop High-Performing Mobile Apps using React Native

We have a team of top-notch mobile app developers that are expert in building engaging cross-platform mobile apps that are tailored to your unique business goals.

Build Your App Now

Cross-Platform App Development

  • Cross-platform mobile apps are built using frameworks and tools that allow developers to write code once and deploy it across multiple platforms.
  • Cross-platform app development refers to the process of creating mobile applications that can run on multiple operating systems or platforms, such as iOS, Android, and Windows, using a single codebase. It allows developers to write the application’s code once and deploy it on various platforms, saving time and effort compared to developing separate apps for each platform.

Cross-platform mobile app development frameworks provide a layer of abstraction that enables developers to develop mobile apps using common programming languages, libraries, and tools.

These frameworks facilitate the creation of platform-agnostic apps that can access native device features and functionalities.

There are several popular cross-platform app development frameworks available, including:

  • React Native: Developed by Facebook, React Native uses JavaScript and allows developers to build native-like apps for iOS and Android using a single codebase. So, you need to be aware of React Native best practices to make your mobile application development easier.
  • Flutter: Developed by Google, Flutter utilizes Dart programming language and offers a rich set of customizable UI components, enabling developers to build high-performance apps for multiple platforms.
  • Xamarin: Owned by Microsoft, Xamarin uses C# and .NET framework, providing a comprehensive toolset for developing cross-platform apps that have a native look and feel.
  • Ionic: Based on web technologies like HTML, CSS, and JavaScript, Ionic allows developers to build hybrid mobile apps that can run on various platforms using a single codebase.

Benefits of cross-platform app development include:

  • Code Reusability: Developers can write code once and reuse it across multiple platforms, saving time and effort in the development process.
  • Cost-Effectiveness: Building a single cross-platform app reduces development costs compared to creating a separate native mobile app for each platform.
  • Faster Time to Market: Cross-platform development enables simultaneous deployment on multiple platforms, reducing the time it takes to reach a broader user base.
  • Maintainability: With a single codebase, updates and bug fixes can be applied more efficiently, as changes are reflected across all platforms simultaneously.

However, cross-platform app development also has some considerations. As cross-platform frameworks provide an abstraction layer, they may not offer the same level of performance or access to platform-specific features as native development.

Additionally, some advanced or specialized functionalities may require platform-specific development.

Therefore, the choice between cross-platform and native development depends on factors such as project requirements, target audience, and development resources available.

Examples of popular cross-platform development frameworks include React Native, Flutter, and Xamarin.

Cross-platform development offers the advantage of code reusability and faster development cycles, as a single codebase can be used for multiple platforms.

Mobile app development involves a range of technologies and tools such as integrated development environments (IDEs), software development kits (SDKs), APIs, and cloud services.

These tools enable developers working with a leading mobile app development company to create engaging and feature-rich mobile applications that cater to various purposes, including entertainment, productivity, communication, e-commerce, social networking, and more.

We’re Expert in Delivering Best Cross-Platform App Development Solutions

Our team of talented mobile app developers are proficient in using cross-platform technologies to build apps for your business solutions.

Contact Us

What is the Importance of Mobile App Development?

Mobile app development is of significant importance in today’s digital era. Here are some key reasons why mobile app development is important:

  • Ubiquitous Mobile Usage: Mobile devices, such as smartphones and tablets, have become an integral part of people’s lives. The majority of individuals rely on most mobile apps for various purposes, including communication, entertainment, information, productivity, shopping, and more. Unlike web apps, developing mobile apps allows businesses to reach and engage with a vast user base.
  • Enhanced Customer Experience: Mobile apps provide a personalized and convenient user experience. They can be tailored to meet specific user preferences, deliver relevant content, and offer seamless interactions. By offering a well-designed and user-friendly app, businesses can enhance customer satisfaction, loyalty, and retention.
  • Increased Market Penetration: With mobile apps, businesses can tap into the rapidly growing mobile market. Mobile devices have a global reach, and by developing apps, mobile app development companies can expand their market presence beyond geographical boundaries. This allows them to reach a larger audience and potentially increase their customer base.
  • Competitive Advantage: Mobile app development can provide a competitive edge in the market. If a business offers a well-designed, feature-rich app that meets user needs, it can stand out from competitors and attract more customers. By staying ahead of the curve in terms of technology and user experience, businesses can differentiate themselves in the market by delivering a successful app.
  • Direct Marketing Channel: Mobile apps serve as a direct marketing channel for businesses. They enable direct communication with users through push notifications, in-app messages, and personalized offers. This direct access allows companies to deliver targeted marketing campaigns, promote products or services, and keep customers informed about updates, discounts, or new releases.
  • Data and Analytics: Mobile apps provide valuable insights into user behavior and preferences. By collecting and analyzing user data, businesses can gain valuable insights to refine their mobile app development strategy, improve customer experiences, and make data-driven decisions. This information can be used to optimize app performance, enhance user engagement, and identify new business opportunities.
  • Revenue Generation: Mobile apps offer various monetization opportunities for businesses. They can generate revenue through in-app purchases, subscriptions, advertisements, or by offering premium features. Developing a successful and popular app using leading frameworks can become a significant source of income for businesses.
  • Streamlined Business Operations: Mobile apps are not only beneficial for customer-facing activities but also for internal business operations. They can be used for managing inventory, tracking sales, streamlining workflows, improving communication, and increasing productivity. Mobile apps can automate processes, reduce manual efforts, and enhance overall operational efficiency.

Mobile app development is essential for businesses to connect with users, enhance customer experiences, expand market reach, gain a competitive advantage, and optimize business operations.

It has become a crucial aspect of mobile app strategy for organizations across various industries.

Understanding Mobile App Development Process

Mobile App Development Process


Mobile app development is a complex process that involves several stages, from conceptualization to deployment. Here’s a detailed explanation of the mobile app development process:

1. Idea Generation and Research

The idea generation and research stage of mobile app development is a crucial phase where mobile app developers and stakeholders explore and refine their ideas for a new mobile application.

This stage involves brainstorming, researching the market, and gathering information to lay a solid foundation for the mobile app development process. Here are the key steps involved in this stage:

  • Identify the Problem:The first step is to identify the problem or need that the mobile app aims to address. This could be a gap in the market, a user pain point, or an opportunity to improve an existing process or service.
  • Brainstorming and Ideation: Once the problem is identified, it’s time to generate ideas. This involves brainstorming sessions with stakeholders, mobile app developers, designers, and potential users. The goal is to generate a wide range of ideas that could potentially solve the identified problem.
  • Feasibility Analysis: After brainstorming, it’s important to evaluate the feasibility of each idea. This analysis considers factors such as technical feasibility, market potential, target audience, development resources, and potential competition. The aim is to shortlist the most viable and promising ideas for further research.
  • Market Research: Research the target market to understand user preferences, behavior, and existing solutions. This involves studying competitors’ apps, analyzing user reviews, conducting surveys or interviews, and gathering data on market’s mobile app development trends and demands. The insights gained from market research help refine the app idea and make it more relevant and competitive.
  • User Persona Development: Create user personas or profiles that represent the target audience. User personas help in understanding users’ needs, preferences, and behaviors, which influence the mobile app design process and app’s functionality. This step ensures that the app caters to the specific needs of the intended users.
  • User Journey Mapping: Visualize the user’s journey within the app by creating user journey maps. This involves outlining the steps users will take, their interactions with the app, and their goals at each stage. User’s app development journey mapping helps identify pain points, opportunities for improvement, and areas where the app can provide value to users.
  • Feature Definition: Based on the research and analysis conducted, define the core features and functionalities of the mobile app. Prioritize the features that align with the app’s purpose, user needs, and market demands. This step helps create a clear roadmap for the development process.
  • Proof of Concept: Develop a proof of concept (POC) or a minimum viable product (MVP) to validate the feasibility and viability of the mobile app idea. The POC/MVP focuses on implementing the essential features to showcase the concept to potential investors, stakeholders, or early mobile users for feedback and validation.
  • Documentation: Document all the findings, research outcomes, user personas, feature definitions, and other relevant information. This documentation serves as a reference point for the hybrid app development team and helps maintain a clear understanding of the app’s goals and requirements throughout the development process.

The idea generation and research stage is essential for laying a strong foundation for the mobile app development process.

It helps define the purpose, target audience, and core features of the app, ensuring that the development effort is focused, relevant, and aligned with user needs and market demands.

2. Planning and Requirements Analysis

The Planning and Requirements Analysis phase is a crucial step in the mobile app development process.

During this phase, the development team works closely with stakeholders, such as clients, users, and business analysts, to gather and analyze the necessary information to understand the app’s purpose, objectives, and target audience.

Here’s a breakdown of the key activities involved in this phase:

  • Goal Identification: The development team collaborates with the client to determine the project’s goals and objectives. They define what the app aims to achieve, such as increasing sales, improving user experience, or enhancing productivity.
  • Stakeholder Analysis: The team identifies and analyzes the stakeholders who will be involved in or impacted by the app development. This includes end-users, administrators, managers, and any other individuals or groups relevant to the app’s success.
  • Market Research: The team conducts a thorough analysis of the target market to identify user needs, preferences, and competitors. This research helps in understanding the competitive landscape, industry trends, and potential opportunities for the app.
  • User Requirements Gathering: The team collects detailed requirements from end-users by conducting interviews, surveys, or focus groups. They aim to understand user expectations, pain points, and the specific features and functionalities desired in the app.
  • Functional and Non-functional Requirements Definition: Based on the gathered information, the team defines both functional requirements (what the app should do) and non-functional requirements (performance, security, scalability, etc.). Functional requirements include specific features, workflows, user interactions, and integration with external systems. Non-functional requirements focus on quality attributes and constraints.
  • Use Case Development: Use cases are created to describe the interactions between users and the app. These use cases help visualize the app’s flow and functionalities from the user’s perspective, providing a clear understanding of how users will interact with the app.
  • User Experience (UX) Design: UX designers create wireframes, mockups, or prototypes to visualize the app’s user interface (UI) and interactions. This helps stakeholders and developers to have a tangible representation of the app’s look and feel, facilitating feedback and iteration.
  • Technical Feasibility Assessment: The development team evaluates the technical feasibility of the app by assessing factors such as the chosen platform (iOS, Android, cross-platform), required integrations, performance expectations, and potential risks or constraints.
  • Project Scope and Constraints: Based on the gathered requirements and technical assessment, the team establishes the project’s scope, outlining the features and functionalities that will be included in the initial version of the app. They also define any mobile app development project constraints, such as budget, timeline, or resource limitations.
  • Documentation: Throughout the Planning and Requirements Analysis phase, all the gathered information, including user requirements, use cases, wireframes, and technical assessments, is documented in detail to serve as a reference for the development team and to ensure everyone involved has a shared understanding of the app’s requirements.

By the end of the Planning and Requirements Analysis phase, the development team should have a comprehensive understanding of the app’s purpose, user requirements, technical feasibility, and project scope.

This knowledge serves as the foundation for the subsequent phases of mobile app development, such as design, development, testing, and deployment.

Create a Robust and Responsive Mobile App With Us

Albiorix is a one-stop solution for mobile app development as we have a team of mobile app development experts to provide you with cost-effective solutions.

Contact Us

3. UI/UX Design

The UI/UX design process for mobile app development involves creating an intuitive and visually appealing interface that enhances the overall user experience.

It focuses on understanding user behavior, preferences, and needs to design a mobile app that is easy to use, visually appealing, and engaging.

Here are the key steps involved in the UI/UX design process for mobile app development:

Research and Analysis

  • User Research: Conduct research to understand the target audience, their demographics, preferences, and behaviors. This includes analyzing user personas, conducting surveys, interviews, and usability testing.
  • Competitive Analysis: Study and analyze similar mobile apps in the market to identify strengths, weaknesses, and opportunities for differentiation.
  • Market Research: Gain insights into the market trends, user expectations, and emerging design patterns.

User Flows and Information Architecture

  • Create user flows: Define the various paths users can take within the app to accomplish their tasks or goals.
  • Information Architecture: Organize and structure the app’s content and features in a logical and intuitive manner. This involves creating wireframes or prototypes to visualize the app’s structure and navigation.

Wireframing and Prototyping

  • Wireframing: Develop low-fidelity wireframes that outline the app’s layout, content placement, and basic interactions. These wireframes serve as a blueprint for the app’s design.
  • Prototyping: Create interactive prototypes using tools like Sketch, Figma, or Adobe XD to simulate user interactions and test the app’s functionality. This helps in validating the design and gathering user feedback.

Visual Design

  • UI Design: Develop the visual elements of the app, including the color scheme, typography, iconography, and overall visual style. Maintain consistency across different screens and ensure that the design aligns with the app’s branding and target audience.
  • Visual Assets: Create high-fidelity designs for each screen of the app, including detailed visual elements and graphics.

Usability Testing

  • Testing With Representative Sample: Conduct usability testing sessions with a representative sample of the target audience. Observe and analyze how users interact with the app, identify pain points, and gather feedback on the design and user experience.
  • Design Based Iterate and refine the design based on the insights gathered from usability testing.

Development Handoff

  • Prepare design specifications and guidelines for developers, including style guides, asset libraries, and any interactive prototype.
  • Ensure clear communication and collaboration between designers and developers to ensure a smooth implementation of the design.

Post-Launch Evaluation

  • Monitor user feedback and app analytics after the app is launched to identify areas for improvement and gather insights for future updates.
  • Continuously iterate and enhance the UI/UX design based on user feedback, market trends, and evolving user needs.

It’s important to note that the UI/UX design process may vary depending on the project scope, team structure, and development methodology.

However, these steps provide a general overview of the typical UI/UX design process for mobile app development.

4. Technical Feasibility Assessment

Technical Feasibility Assessment is an evaluation of the viability and practicality of developing a mobile app from a technical perspective.

It involves analyzing various factors to determine whether the proposed app can be successfully developed, implemented, and maintained within the available resources and constraints.

Here are the key aspects typically considered in a technical feasibility assessment for mobile app development:

  • Platform Compatibility: Determine the target platforms for the app (e.g., iOS, Android) and assess the compatibility of the proposed app concept with those platforms. Consider platform-specific requirements, such as operating system versions, hardware capabilities, and software development frameworks.
  • App Functionality: Evaluate the technical feasibility of implementing the desired features and functionalities within the app. Consider the complexity of the app’s requirements, including user interfaces, data processing, integration with external systems, and any specialized functionalities.
  • Technical Expertise: Assess the availability of the necessary technical skills and expertise within the development team or the entire mobile app development agency. Consider the required programming languages, frameworks, libraries, and tools for building the app, as well as any specialized knowledge needed for specific functionalities or integrations.
  • Data Management and Security: Evaluate the feasibility of handling and managing data within the app. Consider aspects such as data storage, retrieval, synchronization, and security. Identify potential risks and compliance requirements related to data privacy and security, and determine whether the necessary measures can be implemented effectively.
  • Performance and Scalability: Analyze the app’s performance requirements and assess whether the proposed solution can meet those requirements. Consider factors such as response times, resource utilization, network connectivity, and potential bottlenecks. Evaluate the scalability of the app to accommodate growing user bases and increasing data loads.
  • Integration and APIs: Assess the feasibility of integrating the app with external systems, services, or APIs. Determine whether the required integrations are technically feasible and if the necessary documentation, support, or access is available from the third-party providers.
  • Development Tools and Infrastructure: Evaluate the availability and suitability of development tools, software frameworks, testing frameworks, and infrastructure required for the app development process. Consider factors such as development environments, version control systems, continuous integration/delivery systems, and testing devices or emulators.
  • Maintenance and Updates: Consider the long-term sustainability of the app. Assess the feasibility of maintaining and updating the app over time, including bug fixes, compatibility with future platform updates, and the availability of resources for ongoing support and enhancements.

5. Development

The development phase of mobile app development is the stage where the actual coding and implementation of the app takes place. It involves transforming the app concept and design into a fully functional mobile application.

Here are the key steps involved in the development phase:

  • Requirement Analysis: The development phase begins with a thorough analysis of the app requirements gathered during the earlier stages. The development team reviews the functional and non-functional requirements, user stories, wireframes, and design specifications to gain a clear understanding of what needs to be built.
  • Technical Design and Architecture: Based on the app requirements, the development team creates a technical design and architecture for the mobile app. This involves selecting the appropriate programming languages, frameworks, and tools, and defining the overall structure of the application, including the database, UI components, and backend systems.
  • Front-end Development: In this step, the user interface (UI) and user experience (UX) design elements are implemented. The development team focuses on creating the app screens, layouts, navigation flows, and interactive elements using programming languages like Swift (for iOS) or Java/Kotlin (for Android). They also integrate any required third-party libraries or frameworks for UI components or functionality.
  • Back-end Development: If the mobile app requires server-side functionality, the back-end development takes place. This involves building the server-side infrastructure, APIs, and databases necessary for the app’s functionality. The development team may use programming languages like Node.js, Python, Ruby, or others, along with frameworks such as Express, Django, or Ruby on Rails.
  • Integration and Testing: Once the front-end and back-end components are developed, they need to be integrated and tested. This involves connecting the app’s UI with the server-side components and ensuring proper data exchange and functionality. Various testing techniques, such as unit testing, integration testing, and user acceptance testing, are performed to identify and fix any bugs or issues.
  • Performance Optimization: During this phase, the app’s performance is optimized to ensure smooth and efficient operation. This includes optimizing code, minimizing network requests, reducing loading times, and optimizing resource usage to enhance the overall user experience. Performance testing and profiling tools may be used to identify and address bottlenecks or performance issues.
  • Quality Assurance and Bug Fixing: The development team conducts comprehensive testing to identify and fix any bugs or usability issues in the app. This includes functional testing, usability testing, compatibility testing across devices and operating systems, security testing, and performance testing. Bugs and issues are logged, prioritized, and addressed through iterative bug fixing and code improvements.
  • Deployment and Distribution: Once the app has undergone thorough testing and all major issues are resolved, it is prepared for deployment. The app is packaged into the appropriate format (APK for Android, IPA for iOS) and submitted to the respective app stores (Google Play Store, Apple App Store) for distribution. The development team ensures compliance with app store guidelines and handles any necessary app signing or certification processes.
  • Maintenance and Updates: After the initial release, the development team continues to provide maintenance and support for the app. This includes addressing user feedback, fixing bugs, releasing updates with new features or enhancements, and ensuring compatibility with new device or platform updates.

Create a Robust and Responsive Mobile App With Us

Albiorix is a one-stop solution for mobile app development as we have a team of mobile app development experts to provide you with cost-effective solutions.

Contact Us

6. Mobile App Testing

The testing stage is an essential part of the mobile app development process. It involves evaluating the app’s functionality, performance, and user experience to identify and fix any issues or bugs before the app is released to the users.

The primary goal of testing is to ensure that the app meets the requirements, works as expected, and provides a seamless and satisfactory user experience.

Here are the key steps typically involved in the testing stage of mobile app development:

  • Test Planning: The testing process begins with creating a detailed test plan that outlines the objectives, scope, and strategies for testing. It includes defining the test scenarios, test cases, and test data required for various app features.
  • Test Environment Setup: The testing team sets up the necessary test environment, including selecting devices (emulators/simulators or physical devices) and configuring the required software and network settings to mimic real-world usage conditions.
  • Functional Testing: This testing phase focuses on verifying the app’s functionality and ensuring that all features and components work as intended. Testers perform a range of tests, including input validation, user interface testing, navigation testing, and feature-specific tests to validate each aspect of the app.
  • Performance Testing: Performance testing evaluates the app’s speed, responsiveness, scalability, and resource usage under different conditions. It includes tests like load testing (measuring app behavior under high user loads), stress testing (pushing the app to its limits), and benchmarking (comparing performance metrics with industry standards).
  • Compatibility Testing: Since mobile devices vary in terms of hardware, operating systems, screen sizes, and other specifications, compatibility testing ensures that the app functions correctly across different devices and platforms. Testers check for any issues related to device-specific features, screen resolutions, network connectivity, and software versions.
  • Usability Testing: Usability testing focuses on assessing the app’s user experience (UX) and user interface (UI). Testers evaluate how easily users can navigate through the app, perform tasks, and accomplish their goals. Feedback on the app’s design, layout, intuitiveness, and overall user satisfaction is collected and used to make necessary improvements.
  • Security Testing: Security testing helps identify vulnerabilities and ensures that user data and sensitive information are protected. Testers assess the app for potential security risks such as data leakage, unauthorized access, authentication flaws, and encryption weaknesses.
  • Regression Testing: As new features or bug fixes are implemented during the development process, regression testing is performed to ensure that existing functionalities haven’t been affected. Testers retest previously tested scenarios to verify that the changes have not introduced any new issues.
  • User Acceptance Testing (UAT): UAT involves involving a group of end-users or beta testers to evaluate the app in a real-world environment. These users provide feedback on the app’s usability, functionality, and overall satisfaction. This feedback helps developers identify any remaining issues or areas for improvement.
  • Bug Tracking and Fixing: Throughout the testing phase, testers identify and document any issues, defects, or bugs using a bug tracking system. Developers then prioritize and fix these issues, and the cycle continues until all critical bugs are resolved.
  • Retesting and Sign-off: Once the reported issues are fixed, the app undergoes a retesting phase to ensure that the fixes have been successful and haven’t introduced new problems. When all the test cases pass and the app meets the predefined criteria, it is ready for final sign-off from the stakeholders, indicating that it is ready for release.

7. Deployment and Distribution

The deployment and distribution phase of mobile app development refers to the process of making the app available to users for installation and use on their mobile devices.

This phase typically follows the completion of app development and involves preparing the app for release, submitting it to the respective app stores, and ensuring its distribution to the target audience.

Here’s an overview of the key steps involved:

  • App Store Guidelines: Before deploying your app, it’s important to review the guidelines provided by the app stores you intend to distribute your app through. Different app stores, such as Apple’s App Store and Google Play Store, have specific requirements and policies that your app must comply with.
  • Testing and Quality Assurance: Prior to distribution, thoroughly test your app to ensure it functions properly on various devices and operating systems. This includes checking for bugs, usability issues, and compatibility across different screen sizes and resolutions.
  • App Store Developer Account: To distribute your app through official app stores, you need to create a developer account. This involves providing the necessary information and, in some cases, paying a registration fee. Each platform has its own developer program, such as the Apple Developer Program and the Google Play Console.
  • App Submission: Once your app is ready for release, you submit it to the respective app stores for review. Prepare the necessary assets, such as app icons, screenshots, descriptions, and promotional materials, as required by the app store guidelines. Submitting your app initiates a review process, during which the app store assesses its compliance with their policies and checks for any potential issues.
  • App Store Review Process: The review process varies across platforms but typically involves reviewing the app’s functionality, content, and adherence to the store’s guidelines. This process can take several days to a few weeks. In case any issues or violations are identified, you may receive feedback from the app store, and you’ll need to address these concerns and resubmit your app for review.
  • Release and Distribution: Once your app passes the review process, it can be released to the app store. You can specify the release date, and the app store will make it available for download and installation to users. App updates can also follow a similar submission and review process.
  • Mobile App Promotion and Marketing: After the app is available in the app store, it’s important to promote and market it to increase visibility and attract users. Utilize various marketing channels, such as social media, online advertisements, press releases, and app review websites, to reach your target audience and encourage downloads.
  • User Feedback and Updates: Monitor user feedback and reviews after the app’s release. Address any reported issues, listen to user suggestions, and continuously improve your app through updates and feature enhancements. Regular updates help retain users and maintain the app’s relevance in a competitive market.

It’s worth noting that besides official app stores, there are alternative distribution methods, such as enterprise app stores, sideloading (direct installation of apps without an app store), and beta testing platforms, which cater to specific needs and audiences.

Throughout the entire mobile app development process, it’s crucial to maintain effective communication and collaboration among the development team, stakeholders, and mobile app users to ensure a successful and high-quality app.

How to Outsource Mobile App Development?

Outsourcing mobile app development can be a strategic decision to leverage external expertise, reduce costs, and accelerate the development process. Here’s a step-by-step guide on how to outsource mobile app development:

  • Define your project requirements: Begin by clearly defining your project requirements, including the app’s purpose, features, target audience, platforms, and desired timeline. This will help you communicate your expectations effectively to potential outsourcing partners.
  • Research and shortlist outsourcing partners: Conduct thorough research to identify potential outsourcing partners. Look for companies or freelancers with a strong portfolio, relevant experience in mobile app development, positive client reviews, and a good reputation. Shortlist the most promising candidates.
  • Evaluate and interview potential partners: Contact the shortlisted outsourcing partners to discuss your project in detail. Evaluate their expertise, technological capabilities, communication skills, and work processes. Ask for references and examples of their previous work. Schedule interviews or video conferences to get a better understanding of their capabilities and culture.
  • Define the project scope and timeline: Work closely with the selected outsourcing partner to clearly define the project scope, timeline, milestones, and deliverables. Ensure that both parties have a mutual understanding of the project requirements and expectations.
  • Establish clear communication channels: Effective communication is crucial for successful outsourcing. Establish clear communication channels and determine the frequency and mode of communication. Utilize project management tools, instant messaging platforms, and video conferencing to facilitate collaboration and transparency.
  • Create a detailed contract: Prepare a detailed contract that outlines the project scope, timeline, milestones, deliverables, payment terms, confidentiality agreements, and intellectual property rights. It’s recommended to involve legal professionals to ensure all aspects are covered adequately.
  • Monitor progress and maintain transparency: Regularly monitor the progress of the mobile app development. Request updates and demo versions at agreed-upon milestones. Maintain transparency by having access to the project’s code repository, design files, and project management tools.
  • Provide timely feedback: Provide timely and constructive feedback throughout the development process. This helps the outsourcing partner make necessary adjustments and ensures alignment with your expectations.
  • Test and quality assurance: Once the development phase is complete, collaborate with the outsourcing partner to conduct thorough testing and quality assurance processes. Test the app on different devices, platforms, and network conditions to ensure optimal performance.
  • Deployment and ongoing support: Work with the outsourcing partner to deploy the app to the relevant app stores or platforms. Discuss post-launch support, bug fixing, updates, and maintenance responsibilities. Establish a plan for ongoing support and maintenance.

Remember, successful outsourcing relies on clear communication, mutual trust, and effective collaboration. Regularly assess the progress and ensure that the outsourcing partner meets your expectations throughout the development process.

What Are The Best Mobile App Development Platforms?

Mobile App Development Platforms

There are several excellent mobile app development platforms available today that offer a range of features and capabilities.

The best platform for you will depend on your specific requirements, such as your target platform (iOS, Android, or both), your technical expertise, the complexity of your app, and your budget.

Here are some popular mobile app development platforms:

  • Android Studio: Android Studio is the official integrated development environment (IDE) for Android app development. It provides a comprehensive set of tools and features for building Android apps using the Java, Kotlin, or C++ programming languages.
  • Xcode: Xcode is the official IDE for iOS app development. It offers a powerful set of tools and an intuitive interface for creating iOS apps specifically for Apple devices. Xcode uses the Swift or Objective-C programming languages.
  • React Native: React Native is an open-source framework developed by Facebook. It allows you to build cross-platform mobile apps using JavaScript and the React framework. With React Native, you can write code once and deploy it on both iOS apps and Android platforms, saving development time.
  • Flutter: Flutter is another popular open-source framework, developed by Google. It enables you to build high-performance, visually appealing apps for both iOS and Android using a single codebase. Flutter uses the Dart programming language and provides a rich set of pre-built UI components.
  • Xamarin: Xamarin, owned by Microsoft, allows you to build native apps for iOS, Android, and Windows using a shared C# codebase. It provides a wide range of tools, libraries, and APIs, making it easier to create cross-platform apps while still leveraging the native performance and capabilities of each platform.
  • Appcelerator Titanium: Appcelerator Titanium is a JavaScript-based platform that enables the development of native apps for iOS, Android, and Windows using a single codebase. It provides a comprehensive set of features and allows access to native device functionality through its APIs.
  • PhoneGap (Apache Cordova): PhoneGap, also known as Apache Cordova, is an open-source mobile app development framework. It allows developers to use web technologies such as HTML5, CSS, and JavaScript to build cross-platform apps that can run on various mobile platforms.

These are just a few examples of the best mobile app development platforms available. It’s important to evaluate each platform based on your specific requirements and preferences to choose the one that best suits your needs.

How Much Does it Cost to Build an App From Scratch?

The cost to make an app from scratch can vary significantly based on various factors, including the complexity of the app, the platform(s) you’re targeting (iOS, Android, or both), the features and functionalities required, the design complexity, the development approach (native or cross-platform), and the region or development company you choose to work with.

Factors That Affect the Cost of Mobile App Development
How much does it cost to build an app usually depends on few essential things:

Factors That Affect the Cost of Mobile App Development

Several factors can affect the cost of mobile application development. Here are some of the key elements: Let’s explore every parameter in detail to make your application more robust.

1. App complexity: The app’s complexity is one of the main factors influencing development costs. Apps with more app’s features, mobile app’s functionaliy , and integration require more time.

2. App Platform compatibility: Developing a mobile app for multiple platforms (such as iOS, Android, and web) and mobile devices will typically increase costs compared to developing a single platform.

3. Design and User Interface (UI): The complexity of the mobile app’s design and user interface can impact the app’s cost. Mobile apps with intricate designs, custom animations, and high-quality visuals may require more design work and development time, thus increasing the cost.

4. Integration: If the mobile application needs to integrate with other systems or third-party APIs (such as payment gateways, social networking platforms, or mapping services), the application development cost can increase.

5. Backend development and App infrastructure: The complexity of the app’s backend infrastructure, including app server setup, databases, app store optimization and API development, can influence the app’s cost.

6. Testing and QA: Thorough mobile app testing and quality assurance processes are crucial for new app reliability and user satisfaction. The more comprehensive the testing requirements, including compatibility on all mobile device, performance, and security, the higher the development cost.

7. App Updates and Maintenance: Ongoing maintenance to keep the app compatible with new operating system versions on app store, security updates, and user feedback can contribute to the overall cost.

Conclusion

In conclusion, mobile app development is a complex but rewarding endeavour to get rid from this you should contact app development company.

Albiorix have worked on several complex and innovative mobile app to help businesses create mobile apps that help in business.

By following the guidelines and best practices outlined in this guide, developers can create successful mobile applications that delight users, achieve business goals, and make a lasting impact in the dynamic and ever-evolving mobile app market.

Remember that mobile app development is a continuous journey. Embrace feedback and user reviews to continuously improve and enhance your app’s features and functionalities.

By staying dedicated, adaptable, and focused on providing value to your users you have the potential to create remarkable and successful mobile applications. For more information, feel free to consult Albiorix for the best mobile app development.

Web Development Best Practices 2026: The Complete Guide

Summary: Web development best practices in 2026 go far beyond clean code. This guide covers the 15 practices that protect performance, security, accessibility, and long-term scalability — including Core Web Vitals targets, WCAG 2.2 AA compliance, React Server Components, OWASP Top 10:2025, CI/CD automation, and AI search visibility. Each section includes implementation specifics, measurable thresholds, and a quick-reference checklist.

TL;DR – Web Development Checklist 2026

Use this as your quick-reference before building, auditing, or deploying any web project in 2026.

  • Plan before you code — define scope, product type, and ownership model
  • Mobile-first design as the default, not an afterthought
  • Core Web Vitals: INP ≤200ms (p75), LCP ≤2.5s, CLS <0.1
  • Use semantic HTML and WCAG 2.2 AA accessibility standard
  • OWASP Top 10:2025 security compliance from day one
  • Server-side rendering (SSR/ISR) or React Server Components for performance
  • API-first and composable architecture for scalability
  • CI/CD pipeline with automated testing and rollback capability
  • Write clean, modular, strictly-typed code (TypeScript preferred)
  • Cross-browser + cross-device testing before every release
  • SEO baked in: schema markup, crawlable links, structured data
  • AI search visibility: optimize for AEO and GEO, not just traditional SEO
  • Observability and post-launch monitoring from day one
  • Documentation as a first-class deliverable, not an afterthought
  • Build an interconnected ecosystem — web, app, and software together

Web Development Best Practices for 2026

The bar for web development has risen sharply. In 2026, search engines treat Core Web Vitals as hard ranking factors. Digital accessibility enforcement has tightened in the USA, EU, and other major markets. AI tools now sit between users and websites — changing how content is discovered and consumed. And security threats grow more sophisticated with every quarter.

The web development best practices in this guide are not new discoveries. Performance, security, accessibility, mobile-first architecture, and clean code have always mattered. What has changed is the cost of ignoring them — in rankings, in compliance risk, in user retention, and in the technical debt that slows every future feature.

This guide covers 15 essential practices with specific, measurable targets you can implement today. Whether you are starting a greenfield project or auditing an existing site, these principles apply equally.

What Is Web Development?

Web development is the process of building, maintaining, and evolving websites and web applications. It encompasses everything from simple static landing pages to complex, multi-service platforms handling millions of concurrent users.

Modern web development covers three interconnected layers:

  • Front-end development — HTML, CSS, JavaScript, and frameworks like React or Vue that control what users see and interact with
  • Back-end development — server logic, databases, APIs, and infrastructure that power application behavior
  • Full-stack development — end-to-end ownership spanning both layers, increasingly common in product-focused teams

In 2026, the discipline also includes performance engineering (Core Web Vitals), accessibility compliance (WCAG 2.2), security architecture (OWASP), and AI-ready content strategy. Understanding the full scope is the first step toward building websites that perform, rank, and convert.

1. Planning and Architecture Before Code

Every successful web project starts with clarity — on scope, audience, product type, and who owns each decision. Skipping this phase is the single most common source of technical debt, missed deadlines, and expensive rebuilds.

Define product type first

A website, a web application languages, and a content platform look similar on the surface but break in very different ways. Define which you are building before choosing your stack, because the wrong architecture compounds over time:

  • Content-heavy site → prioritize SSR/ISR, CDN edge delivery, schema markup
  • Interactive web app → prioritize state management, API design, real-time capabilities
  • E-commerce platform → prioritize performance, conversion optimization, payment security
  • Internal tool / SaaS → prioritize scalability, role-based access, observability

Key planning activities

  • Gather and document requirements before wireframing
  • Define target audience and device/browser matrix
  • Create a project roadmap with clear milestones and ownership
  • Conduct a technology audit if updating an existing system
  • Identify scalability requirements and projected traffic growth

Effective planning reduces rework and keeps the project aligned with business goals from start to finish. It also makes design and development faster — teams move with confidence when the foundation is clear.

Planning checklist
✓ Product type defined (content site, web app, e-commerce, SaaS)
✓ Requirements documented and signed off
✓ Technology stack chosen to match product type
✓ Scalability and performance targets set before coding begins
✓ Accessibility and compliance requirements identified upfront

2. Mobile-First Responsive Design

Mobile devices now account for more than half of all global web traffic. In 2026, mobile-first is the default stance — not an optional enhancement. The distinction between mobile-first and simply responsive design matters significantly.

Responsive design adapts a desktop layout to smaller screens. Mobile-first design starts with the smallest screen and progressively enhances the experience for larger viewports. The latter produces faster, leaner code and better results on the devices most of your users actually have.

Implementation principles

  • Write CSS with min-width media queries, starting from the smallest viewport
  • Design touch targets at 44×44px minimum (WCAG 2.2 Target Size criterion)
  • Prioritize content hierarchy for small screens — what matters first
  • Use fluid typography with clamp() rather than fixed breakpoints
  • Test on real devices, not just browser DevTools emulation

Why it matters for SEO

Google uses mobile-first indexing — it crawls and ranks your site based on its mobile version. A site that degrades on mobile directly loses rankings, regardless of how well the desktop version performs.

Mobile-first checklist
✓ CSS written mobile-first with min-width media queries
✓ Touch targets minimum 44x44px
✓ Fluid layouts using CSS Grid and Flexbox
✓ Tested on real iOS and Android devices before launch
✓ Google Mobile-Friendly Test passes with no issues

3. Performance Optimization and Core Web Vitals

In 2026, performance is a ranking signal, a business metric, and a user expectation. A 3-second load delay drives away nearly 40% of visitors before they see a single piece of content. Google’s Core Web Vitals are the measurable framework for performance — and they are hard ranking factors, not soft signals.

Core Web Vitals targets for 2026

MetricWhat it measuresGood thresholdNeeds improvement
INP (Interaction to Next Paint)Responsiveness to user input≤200ms (p75)200–500ms
LCP (Largest Contentful Paint)Loading speed of main content≤2.5s2.5–4.0s
CLS (Cumulative Layout Shift)Visual stability during load<0.10.1–0.25

INP replaced FID as a Core Web Vital in March 2024 and is the metric most developers struggle with in 2026. It measures the full event duration from user interaction to the next visual frame — including JavaScript execution time.

Key optimization techniques

  • Minimize render-blocking JavaScript — defer non-critical scripts
  • Optimize images: use WebP/AVIF formats, implement lazy loading, set explicit width/height
  • Use a Content Delivery Network (CDN) for static assets
  • Implement browser caching with appropriate cache-control headers
  • Reduce JavaScript bundle size: code splitting, tree shaking, dynamic imports
  • Preload critical resources (fonts, above-fold images)
  • Use React Server Components or SSR to reduce client-side JS payload
  • Monitor performance continuously with Lighthouse, PageSpeed Insights, and CrUX data
Performance checklist
✓ INP ≤200ms at p75 — measured in field data (CrUX), not lab only
✓ LCP ≤2.5s — largest image or text block loads within 2.5 seconds
✓ CLS <0.1 — no unexpected layout shifts during or after load
✓ Images in WebP or AVIF with explicit dimensions
✓ JavaScript bundle analyzed and code-split at route boundaries
✓ CDN configured for static assets
✓ Performance monitored in production via Real User Monitoring (RUM)

4. Modern Rendering Architecture (RSC, SSR, ISR)

How your pages are rendered has a direct impact on performance, SEO, and user experience. Choosing the right modern web application architecture dictates how components run, and In 2026, React Server Components (RSC) have become the default for serious Next.js applications, and the shift toward server-first architecture is accelerating.

ApproachvBest forSEOPerformanceComplexity
Static Site Generation (SSG)Content that rarely changesExcellentFastestLow
Server-Side Rendering (SSR)Dynamic, user-specific contentExcellentGoodMedium
Incremental Static Regeneration (ISR)Content updated periodicallyExcellentVery fastMedium
React Server Components (RSC)Mixed static/dynamic appsExcellentBest in classMedium-high
Client-Side Rendering (CSR)Highly interactive appsLimitedVariableMedium

Why React Server Components matter

RSC allows components to run on the server and stream HTML to the client without shipping their code to the browser. This typically reduces JavaScript bundle size by 60–70%, dramatically improving LCP and INP scores. RSC is now the default for Next.js App Router projects and should be the starting point for most new React applications.

  • Move data-fetching components to the server — eliminate client waterfalls
  • Keep interactive components client-only using ‘use client’ directive
  • Use Suspense boundaries for progressive streaming of content

5. Security — OWASP Top 10:2025 Compliance

RiskWhat it means for your sitePriority fix
Broken Access ControlUsers accessing data they shouldn’tEnforce least-privilege on every route
Cryptographic FailuresSensitive data exposed in transit or at restEnforce HTTPS, encrypt sensitive fields
Injection (SQL, XSS, etc.)Malicious input executed as codeParameterized queries, input validation
Insecure DesignMissing security controls at architecture levelThreat modelling during planning phase
Security MisconfigurationDefault configs, unnecessary features enabledHarden all environments, disable defaults
Vulnerable ComponentsOutdated libraries with known CVEsAutomated dependency scanning (Dependabot)
Broken AuthenticationWeak credentials, missing MFAMFA, rate limiting, secure session handling
Software & Data IntegrityCode or CI/CD pipeline tamperingSign releases, verify dependencies
Security Logging FailuresAttacks go undetectedCentralized logging, anomaly alerting
SSRFServer-side requests to internal resourcesValidate and restrict outbound URLs

Foundational security practices

  • Enforce HTTPS everywhere — no exceptions, including internal services
  • Implement Content Security Policy (CSP) headers to prevent XSS
  • Use parameterized queries or ORMs — never concatenate SQL
  • Run automated dependency vulnerability scanning in CI/CD
  • Conduct penetration testing before major releases
  • Implement rate limiting and CAPTCHA on all authentication endpoints
  • Keep all frameworks, libraries, and runtime versions current
Security checklist
✓ HTTPS enforced across all environments
✓ OWASP Top 10:2025 threat model reviewed and addressed
✓ Dependency vulnerability scanning automated in CI pipeline
✓ Authentication uses MFA and rate limiting
✓ Input validation and output encoding on all user-supplied data
✓ Security headers configured: CSP, HSTS, X-Frame-Options, X-Content-Type-Options
✓ Regular security audits and penetration testing scheduled

6. Accessibility — WCAG 2.2 AA Compliance

Accessibility is no longer optional. WCAG 2.2 AA is now a legal requirement in the European Union (under the European Accessibility Act), enforced in the USA (under ADA and Section 508), and increasingly mandated in other markets. Beyond compliance, accessible websites serve all users better — including those on slow connections, older devices, or using keyboard navigation.

What changed in WCAG 2.2

WCAG 2.2, finalized in October 2023, added new success criteria that directly affect most websites:

  • 2.4.11 Focus Appearance — visible focus indicators must meet minimum size and contrast ratios
  • 2.4.12 Focus Not Obscured — focused elements must not be fully hidden by sticky headers or overlays
  • 2.5.3 Target Size (Minimum) — interactive targets must be at least 24×24 CSS pixels
  • 3.2.6 Consistent Help — help mechanisms (chat, FAQs, contact info) must appear consistently
  • 3.3.7 Redundant Entry — forms must not require users to re-enter information already provided
  • 3.3.8 Accessible Authentication — CAPTCHA cannot be the sole authentication mechanism

Core accessibility implementation

  • Use semantic HTML elements: <header>, <main>, <nav>, <article>, <section>, <footer>
  • Every image must have descriptive alt text (or alt=”” for decorative images)
  • All interactive elements must be keyboard-accessible in logical tab order
  • Color contrast ratio: 4.5:1 minimum for normal text, 3:1 for large text
  • Form inputs must have associated elements
  • Provide captions for video content and transcripts for audio
  • Test with screen readers (NVDA, VoiceOver) and keyboard-only navigation
Accessibility checklist
✓ WCAG 2.2 AA audit completed with automated tool (axe, WAVE, Lighthouse)
✓ All images have appropriate alt text
✓ Keyboard navigation works across all interactive elements
✓ Color contrast meets 4.5:1 for body text, 3:1 for large text
✓ Focus indicators clearly visible and not obscured
✓ Touch targets minimum 24x24px (44x44px recommended)
✓ Screen reader tested on at least one major assistive technology

7. SEO-Friendly Development

Search engine optimization starts in the code. Technical SEO decisions made during development — URL structure, semantic markup, schema, rendering strategy — determine the ceiling of your organic visibility. These cannot be fully patched in retrospect.

Technical SEO fundamentals

  • Use semantic HTML5 — one <h1> per page, logical heading hierarchy (h1 → h2 → h3)
  • Clean, descriptive URLs: /blog/web-development-best-practices/ not /blog/post?id=42
  • Implement canonical tags to prevent duplicate content penalties
  • Create and submit an XML sitemap; keep it updated automatically
  • Use robots.txt to guide crawler behavior for large or complex sites
  • Ensure all pages are crawlable — no critical content hidden behind JavaScript walls and also check-out JavaScript Libraries for more info.

Schema markup and structured data

Schema markup (JSON-LD) tells search engines exactly what your content is — enabling rich results in SERPs. For blog posts and technical guides, the highest-impact schemas are:

  • Article schema — author, date published, date modified, breadcrumb
  • FAQPage schema — captures People Also Ask slots for informational content
  • HowTo schema — step-by-step guides and tutorials
  • BreadcrumbList schema — improves navigation display in search results

AI Search Visibility: AEO and GEO

In 2026, AI tools (ChatGPT, Perplexity, Google AI Overviews) sit between users and search results. Answer Engine Optimization (AEO) and Generative Engine Optimization (GEO) are the emerging strategies for visibility in AI-mediated search:

  • Structure content around questions users actually ask — FAQ format signals AI-readiness
  • Use clear, authoritative prose with specific facts and cite sources
  • Ensure pages load fast and are crawlable — AI scrapers respect technical quality signals
  • Build E-E-A-T signals: clear authorship, credentials, external citations
SEO checklist
✓ Semantic HTML with correct heading hierarchy
✓ Clean, descriptive URL structure
✓ FAQ schema and Article schema implemented in JSON-LD
✓ XML sitemap submitted and verified in Google Search Console
✓ Core Web Vitals in the ‘Good’ range (directly affects rankings)
✓ All pages crawlable — no critical content JavaScript-only
✓ Internal linking structure supports topical authority

8. API-First and Composable Architecture

Modern web applications are built around APIs, not monolithic page-by-page servers. An API-first approach means designing your data and functionality as services that can be consumed by any client — web, mobile, third-party integrations, or AI agents.

Why API-first matters in 2026

  • Enables headless and composable architectures — swap front-end without touching back-end
  • Supports multiple clients (web, mobile, desktop) from a single data layer
  • Improves team independence — front-end and back-end can evolve at different speeds
  • Makes integration with third-party services and AI agents straightforward

RESTful and GraphQL best practices

  • Design API contracts before writing implementation code
  • Version your APIs (/v1/, /v2/) to allow safe evolution
  • Use standard HTTP status codes correctly and consistently
  • Implement authentication (OAuth 2.0 / JWT) on all endpoints
  • Rate-limit APIs to protect against abuse and DDoS
  • Document APIs with OpenAPI/Swagger — auto-generate client SDKs
  • Validate request and response shapes with strict schemas

9. Clean, Maintainable Code

Code quality directly determines how fast your team can ship, how many bugs you ship with it, and how expensive maintenance becomes over time. In 2026, TypeScript has become the baseline expectation for serious web projects — its static typing catches entire classes of bugs before they reach production.

Core principles

  • Write for the next person in line — professional web developers understand that code is read far more than it is written
  • Use TypeScript with strict mode enabled — catch type errors at compile time
  • Follow a consistent coding style enforced by ESLint + Prettier
  • Break code into small, single-responsibility functions and components
  • Remove dead code aggressively — unused code is a maintenance liability
  • Use meaningful variable and function names — avoid abbreviations

Version control and collaboration

  • Use Git with a clear branching strategy (Gitflow or trunk-based development)
  • Write meaningful commit messages (conventional commits format recommended)
  • Require pull request reviews before merging to main
  • Conduct regular code reviews — they catch bugs AND share knowledge
  • Refactor proactively — don’t let technical debt accumulate silently

10. CI/CD Automation and DevSecOps

Continuous integration and continuous deployment (CI/CD) pipelines are the engine of modern web development. Teams that deploy frequently (daily or more) have dramatically fewer production incidents than teams that deploy quarterly — because smaller, more frequent changes are easier to debug and roll back.

CI/CD pipeline components

StagePurposeKey tools
Code commitTrigger pipeline on push or PRGitHub Actions, GitLab CI, CircleCI
Lint and type checkCatch style issues and type errorsESLint, TypeScript compiler
Unit and integration testsVerify component and API behaviorJest, Vitest, Playwright
Security scanningDetect vulnerabilities in dependenciesDependabot, Snyk, OWASP ZAP
BuildCompile and bundle for productionVite, webpack, Turbopack
Deploy to stagingTest in production-like environmentVercel Preview, AWS CodeDeploy
E2E tests on stagingVerify critical user journeysPlaywright, Cypress
Deploy to productionAutomated rollout with rollbackFeature flags, canary deployments

DevSecOps integration

DevSecOps embeds security into every stage of the pipeline rather than treating it as a final gate:

  • Run SAST (Static Application Security Testing) on every commit
  • Scan Docker images and dependencies for known CVEs before deploy
  • Enforce secrets management — no credentials in source code
  • Require security review for any change involving authentication or data handling
CI/CD checklist
✓ Pipeline runs on every push and pull request
✓ Linting, type checking, and unit tests are automated
✓ Security vulnerability scanning runs in CI
✓ Deployment to staging is automatic after passing tests
✓ Production deployments can be rolled back in under 5 minutes
✓ Environment variables and secrets managed outside the codebase

11. Automated Testing

Automated testing is the safety net that allows teams to move quickly without breaking things. Without tests, every change is a gamble. With them, refactoring is safe, deployments are confident, and bugs are caught before users find them.

Testing pyramid

  • Unit tests — test individual functions and components in isolation (fast, many)
  • Integration tests — test how components and APIs interact (medium speed, selective)
  • End-to-end (E2E) tests — simulate real user journeys in a browser (slower, critical paths only)
  • Visual regression tests — catch unintended UI changes (Chromatic, Percy)
  • Performance tests — verify Core Web Vitals don’t degrade across releases

Testing best practices

  • Write tests alongside code — not as a separate phase
  • Test behavior, not implementation — tests should survive refactoring
  • Maintain test coverage above 80% for critical business logic
  • Run tests in CI on every pull request — blocking merges on failure
  • Use test-driven development (TDD) for complex business logic

12. Cross-Browser and Cross-Device Compatibility

In 2026, users access websites from an extraordinary range of browsers, devices, screen sizes, and operating systems. Your website must behave consistently across all of them — inconsistencies destroy user trust and conversion rates.

Testing matrix

CategoryWhat to test
Desktop browsersChrome, Firefox, Safari (macOS), Edge — latest 2 versions minimum
Mobile browsersSafari on iOS (critical — uses WebKit on all iPhones), Chrome on Android
Screen sizes320px (small mobile), 768px (tablet), 1280px, 1440px, 1920px (desktop)
Input methodsMouse, keyboard-only, touch, stylus
Assistive techScreen readers (VoiceOver, NVDA), zoom up to 400%
Network conditionsSlow 3G, 4G, broadband — use DevTools throttling

Tools and approach

  • Use BrowserStack or Sauce Labs for real-device testing across platforms
  • Run automated Playwright or Cypress tests across multiple browser targets in CI
  • Use CSS feature detection (@supports) rather than browser detection
  • Test with Chrome DevTools coverage tool to identify unused CSS and JS

13. Observability and Post-Launch Monitoring

Shipping a website is not the end of the process — it is the beginning. What happens after launch determines whether your site improves or slowly degrades. Observability means having the data to see exactly what is happening in production, with enough context to diagnose and fix issues quickly.

Three pillars of observability

  • Logs — structured application logs that capture events, errors, and state changes
  • Metrics — quantitative measurements (response time, error rate, throughput, Core Web Vitals)
  • Traces — distributed request tracing across services and APIs

What to monitor from day one

  • Core Web Vitals in the field (CrUX / Real User Monitoring) — not just Lighthouse lab scores
  • Server error rates and response times — set alerts on 5xx rate above 0.1%
  • JavaScript errors in the browser — Sentry, LogRocket, or similar
  • Uptime monitoring — alert within 1 minute of downtime
  • Security events — failed authentications, rate limit triggers, unusual traffic patterns
  • Business metrics tied to technical performance — conversion rate, bounce rate, session depth
Observability checklist
✓ Real User Monitoring (RUM) deployed for Core Web Vitals field data
✓ Server-side error monitoring and alerting configured
✓ Browser JavaScript error tracking active (Sentry or equivalent)
✓ Uptime monitoring with < 1 minute alert latency
✓ Performance budget defined and monitored — alerts on regression
✓ Structured logging with searchable, queryable log aggregation

14. Documentation

Documentation is frequently the last thing teams invest in and the first thing that slows them down. Undocumented code accumulates invisible risk — every new team member, every refactor, every incident response takes longer without it.

What to document

  • Architecture decisions — especially the reasons behind non-obvious choices
  • API documentation — generated from code using OpenAPI/Swagger where possible
  • Environment setup — new developers should be productive in under one hour
  • Deployment and runbook procedures — what to do when things go wrong
  • Component library — documented props, usage examples, and edge cases (Storybook)

Documentation principles

  • Treat documentation as code — keep it in the same repository, review it in PRs
  • Document decisions, not just outcomes — future maintainers need context
  • Update documentation before closing a PR — not as a separate task later
  • Use diagrams for architecture — a good diagram is worth 1,000 lines of documentation

15. Build an Interconnected Ecosystem

In 2026, successful businesses don’t build websites in isolation. They build unified digital ecosystems where websites, mobile applications, APIs, and internal software share data, deliver consistent experiences, and evolve together.

What a connected ecosystem delivers

  • Consistent user experience across all platforms — web, mobile, desktop
  • Single source of truth for data — accessed securely from anywhere
  • Faster feature deployment — build once, surface everywhere
  • Reduced operational costs through shared services and infrastructure
  • Improved security monitoring across the full surface area

Key architecture principles

  • Design APIs as shared contracts — not point-to-point integrations
  • Use a design system shared across web and mobile surfaces
  • Share authentication and authorization infrastructure across products
  • Centralize logging, monitoring, and alerting across all systems
  • Plan for composability — components that can be recombined as needs change

Businesses that invest in ecosystem architecture gain agility and resilience. When a new product requirement emerges, they can respond in weeks rather than months — because the foundation already exists.

Emerging Trends Shaping Web Development in 2026

Beyond the core practices above, these trends are actively reshaping what best-in-class web development looks like:

AI-augmented development

AI coding assistants (GitHub Copilot, Cursor, Claude) are now standard in developer workflows. They accelerate code generation, documentation, and testing — but they also introduce new risks around security (AI-generated code is not always secure) and code quality (generated code requires careful review). Best practice: use AI assistance to accelerate, but always review generated code through the same standards as human-written code.

Edge computing and CDN-first architecture

Moving compute to the edge — closer to users geographically — reduces latency for global audiences. Cloudflare Workers, Vercel Edge Functions, and similar platforms allow server-side logic to run in over 200 locations worldwide, reducing time-to-first-byte (TTFB) to sub-50ms for most users.

WebAssembly (WASM) in production

WebAssembly enables near-native performance for compute-intensive browser tasks — video processing, data analysis, 3D rendering — without requiring native apps. In 2026, WASM is seeing broader production adoption for performance-critical features.

Progressive Web Apps (PWAs)

PWAs continue to close the gap with native apps: push notifications, offline mode, app installation, and hardware access are all available to web applications in modern browsers. For many use cases, a well-built PWA outperforms a separate native app — at a fraction of the maintenance cost.

Conclusion

Web development best practices in 2026 are not about perfection — they are about building a foundation that supports growth, protects users, and compounds in value over time.

The practices in this guide — from mobile-first design and Core Web Vitals optimization to WCAG 2.2 compliance, OWASP security, and CI/CD automation — represent the standards that separate websites that perform from websites that plateau.

Every practice here has a measurable impact. Core Web Vitals affect rankings and conversions. Accessibility compliance expands your audience and reduces legal risk. Security practices protect your users and your reputation. Clean, well-documented code makes every future improvement faster and cheaper.

Whether you are building a new project or improving an existing one, the right time to implement these standards is now. The cost of retrofitting grows with every release.

15 Web Application Security Best Practices You Need to Know in 2026

Summary: Internet security best practices are essential actions that protect your devices and data from cyber threats. Key habits include enabling multi-factor authentication (MFA), using strong, unique passwords with a manager, and keeping all software continuously updated.

Today, web applications are the backbone of business operations — from customer portals and e-commerce platforms to SaaS dashboards and financial systems. But as applications grow more powerful, so does the attack surface.

In 2026, cybercriminals are leveraging AI-assisted attacks, exploiting cloud misconfigurations, and targeting API endpoints at unprecedented scale. A single breach can cost millions in fines, lost revenue, and reputational damage.

This guide walks you through 15 updated web application security best practices every development team should implement — informed by the latest OWASP guidance, real-world breach patterns, and modern DevSecOps thinking.

Key Takeaways

  • Web application security is a shared responsibility across developers, DevOps, and security teams.
  • The 2026 threat landscape includes AI-powered attacks, supply chain compromises, and API-first vulnerabilities.
  • Zero Trust Architecture has replaced perimeter-based security as the modern standard.
  • Shifting security left — embedding it in CI/CD pipelines — dramatically reduces breach risk and remediation cost.
  • Compliance alone (GDPR, PCI-DSS, SOC 2) is not security. Proactive practices are essential.

What is Web Application Security?

Web application security is the practice of protecting web-based software from threats, vulnerabilities, and unauthorized access. It encompasses the policies, tools, and techniques that ensure the confidentiality, integrity, and availability of your application and its data.

A modern web app security strategy goes beyond firewalls. It covers the entire application lifecycle — from secure design and code review to runtime monitoring and incident response.

Core techniques include:

  • Input validation and output encoding
  • Strong authentication and authorization mechanisms
  • Encryption of data in transit and at rest
  • Web Application Firewalls (WAF) and runtime protection
  • Continuous vulnerability scanning and penetration testing
  • API security and third-party dependency management
  • Security logging, monitoring, and alerting

Why is Web App Security Essential For Your Business?

Security is not just an IT concern — it is a business-critical function. Here is why it demands executive attention in 2026:

Protecting User Data: Web applications handle sensitive personal, financial, and health data. A breach exposes users to identity theft and organizations to regulatory penalties under GDPR, HIPAA, PCI-DSS, and other frameworks.

Preserving Customer Trust: Trust is difficult to build and easy to destroy. A publicized breach drives customers away and can permanently damage brand equity. Security is a competitive differentiator.

Mitigating Financial Loss: The average cost of a data breach reached $4.88 million in 2024 (IBM Cost of a Data Breach Report). Legal fees, regulatory fines, incident response costs, and lost business add up fast.

Ensuring Business Continuity: DDoS attacks, ransomware, and application-layer exploits can take your application offline for hours or days. Downtime translates directly to lost revenue and damaged SLAs.

Protecting Intellectual Property: Proprietary algorithms, trade secrets, and product data are valuable targets. Security measures protect your competitive advantage.

Meeting Compliance Requirements: GDPR, SOC 2, ISO 27001, PCI-DSS, and other standards increasingly require documented security practices — not just annual audits.

Staying Ahead of AI-Powered Threats: In 2026, attackers use AI to automate vulnerability discovery, craft convincing phishing lures, and bypass traditional defenses. Security teams must use AI defensively in response.

The Evolving Threat Landscape in 2026

The security landscape has changed significantly. Understanding what is new is key to prioritizing your defenses:

AI-Augmented Attacks: Threat actors now use large language models to write custom malware, generate phishing content at scale, and automate reconnaissance. Traditional signature-based detection struggles to keep pace.

API Attack Surface Explosion: As applications adopt microservices and headless architectures, APIs have become the primary attack vector. OWASP’s API Security Top 10 now sits alongside the classic Web Application Top 10 in importance.

Supply Chain and Dependency Attacks: The compromise of widely-used open-source packages (npm, PyPI) can poison thousands of downstream applications at once. Software Bill of Materials (SBOM) management is now essential.

Cloud Misconfiguration Exploits: Misconfigured S3 buckets, overpermissioned IAM roles, and exposed Kubernetes dashboards remain among the most exploited vulnerabilities in cloud-native applications.

Prompt Injection in AI-Integrated Apps: Applications that embed LLMs are vulnerable to prompt injection — attackers manipulating AI model behavior to exfiltrate data or bypass access controls.

Common Web App Security Vulnerabilities

Based on the latest OWASP Top 10 (2025 edition) and real-world breach data:

VulnerabilityDescription
Broken Access ControlThe #1 OWASP risk. Users access resources or perform actions outside their permissions.
Cryptographic FailuresWeak encryption, unencrypted data in transit, or hardcoded secrets.
Injection (SQLi, XSS, Command)Malicious input executed as code or queries.
Insecure DesignArchitectural flaws that cannot be patched — they require redesign.
Security MisconfigurationDefault credentials, verbose error messages, unnecessary open ports.
Vulnerable & Outdated ComponentsUnpatched libraries, frameworks, or OS packages.
Authentication FailuresWeak passwords, missing MFA, insecure session management.
Software & Data Integrity FailuresUnverified updates, insecure CI/CD pipelines, deserialization flaws.
Logging & Monitoring FailuresInability to detect, log, or alert on breaches in real time.
Server-Side Request Forgery (SSRF)Server tricked into making unauthorized requests to internal systems.
API Security VulnerabilitiesBroken object-level auth, excessive data exposure, lack of rate limiting.
Prompt InjectionEmerging risk in AI-integrated web apps — attacker manipulates LLM behavior.

15 Web Application Security Best Practices

1. Adopt a Zero Trust Security Architecture

What changed: The old “trust but verify” perimeter model is obsolete. In 2026, with cloud-native apps, remote work, and microservices, there is no reliable perimeter.

Zero Trust operates on the principle: never trust, always verify. Every request — regardless of origin — is authenticated, authorized, and encrypted.

Key implementation steps:

  • Verify identity continuously, not just at login
  • Apply least-privilege access to every user, service, and device
  • Microsegment your network to limit lateral movement
  • Enforce device health checks before granting access
  • Use identity-aware proxies for application access

Zero Trust is now required for compliance with NIST SP 800-207 and is increasingly mandated in US federal contracts.

2. Use Secure Coding Practices with SAST/DAST Integration

Secure code starts with secure habits — but human review alone is insufficient at scale. Integrate automated security testing into your development workflow.

Testing TypeWhenWhat It Finds
SAST (Static Analysis)At commit / PR reviewCode-level bugs, hardcoded secrets, injection flaws
DAST (Dynamic Analysis)Staging / pre-productionRuntime vulnerabilities, auth flaws, misconfigurations
SCA (Software Composition Analysis)CI pipelineVulnerable open-source dependencies
IAST (Interactive Analysis)QA / testing phaseReal-time attack surface analysis

Key practices:

  • Use parameterized queries to prevent SQL injection (never string concatenation)
  • Encode all output to prevent XSS
  • Validate and sanitize all user input on the server side (never trust client-side validation alone)
  • Use established security frameworks rather than writing custom crypto or auth logic
  • Conduct peer code reviews with a security checklist

3. Implement Strong, Modern Authentication

Passwords alone are no longer sufficient. Modern authentication must be layered and phishing-resistant.

Recommended authentication stack for 2026:

  • Passkeys (FIDO2/WebAuthn): The emerging gold standard. Hardware-backed, phishing-resistant, and frictionless. Supported by all major browsers and operating systems.
  • Multi-Factor Authentication (MFA): Mandatory for all user accounts, especially privileged ones. Prefer authenticator apps or hardware tokens over SMS-based OTP (SMS is vulnerable to SIM-swapping).
  • OAuth 2.0 + OIDC: Use well-audited identity providers (Google, Azure AD, Okta) rather than rolling your own auth.
  • Adaptive / Risk-Based Authentication: Elevate authentication requirements based on context — unusual location, new device, high-risk transaction.

Additional practices:

  • Enforce strong password policies with breach detection (check against HaveIBeenPwned databases)
  • Implement account lockout with exponential backoff after failed attempts
  • Rotate session tokens after privilege elevation
  • Store passwords using bcrypt, scrypt, or Argon2 (never MD5 or SHA-1)

4. Apply the Principle of Least Privilege (PoLP) and Zero Standing Privileges

Every user, service account, and process should have only the minimum access needed to do its job — and no more.

In 2026, this extends to:

  • Just-in-Time (JIT) Access: Grant elevated permissions only when needed, for a limited time window, then automatically revoke them. This eliminates “standing privileges” that attackers can exploit.
  • Service Account Hygiene: Audit service accounts regularly. Unused accounts are a common entry point in cloud breaches.
  • Database Access Control: Application accounts should have read/write access only to tables they need — never DBA or root privileges.
  • Infrastructure-as-Code (IaC) Policies: Use tools like AWS IAM Access Analyzer or Open Policy Agent to enforce least-privilege in cloud configurations automatically.

5. Shift Security Left — Embed It in CI/CD Pipelines

“Shifting left” means integrating security checks earlier in the development lifecycle, rather than treating them as a final gate before deployment.

A modern DevSecOps pipeline includes:

  1. Pre-commit hooks: Secret detection (e.g., GitGuardian, truffleHog), linting, SAST
  2. Pull request checks: Automated code scanning, dependency vulnerability alerts
  3. Build stage: SBOM generation, container image scanning
  4. Staging deployment: DAST scanning, OWASP ZAP automated testing
  5. Production monitoring: Runtime Application Self-Protection (RASP), anomaly detection

Fixing a vulnerability at the design stage costs ~10x less than fixing it in production. Shifting left is not just a security best practice — it is a cost optimization strategy.

Web Application Security Best Practices

6. Prioritize API Security

APIs are now the primary attack surface for web applications. OWASP’s API Security Top 10 highlights risks that traditional WAFs often miss.

Critical API security controls:

  • Broken Object Level Authorization (BOLA/IDOR): Every API request must verify the requesting user has rights to the specific object — not just the endpoint. This is the #1 API vulnerability.
  • Rate Limiting and Throttling: Prevent enumeration, brute force, and scraping attacks.
  • API Authentication: All APIs must require authentication. Use short-lived JWT tokens with proper signature validation.
  • Input Validation: Validate request schema strictly — use OpenAPI/Swagger specs as a contract.
  • Sensitive Data Exposure: Never return more data than the client needs. Avoid sending full database objects.
  • API Versioning and Deprecation: Actively decommission old API versions. Zombie endpoints are a common breach vector.
  • API Gateway: Route all traffic through a managed gateway (AWS API Gateway, Kong, Apigee) for centralized auth, rate limiting, and logging.

7. Encrypt Everything — At Rest and In Transit

Encryption is non-negotiable. Cryptographic failures are the #2 risk in OWASP 2025.

In Transit:

  • Enforce TLS 1.3 for all connections. Disable TLS 1.0 and 1.1.
  • Use HSTS (HTTP Strict Transport Security) with a long max-age and include subdomains.
  • Implement certificate pinning for high-value mobile API connections.
  • Use DNSSEC and CAA records to prevent certificate misissuance.

At Rest:

  • Encrypt all sensitive database fields (PII, financial data, health records) using AES-256.
  • Use envelope encryption with a Key Management Service (KMS) — AWS KMS, Azure Key Vault, or HashiCorp Vault.
  • Encrypt database backups and log files.
  • Never store plaintext passwords, API keys, or secrets in code, config files, or environment variables without a secrets manager.

Key Management:

  • Rotate encryption keys on a defined schedule.
  • Separate key management from data storage.
  • Use Hardware Security Modules (HSMs) for the highest-sensitivity applications.

8. Manage Open-Source Dependencies and Supply Chain Risk

The average web application depends on hundreds of open-source packages. Each one is a potential attack vector.

Software Composition Analysis (SCA):

  • Integrate SCA tools (Snyk, Dependabot, OWASP Dependency-Check) into your CI pipeline.
  • Automatically receive alerts when new CVEs are published for your dependencies.
  • Set policy to fail builds when critical vulnerabilities are found.

Software Bill of Materials (SBOM):

  • Generate an SBOM for every release. This is increasingly required by government contracts and enterprise customers.
  • Use SBOM formats: SPDX or CycloneDX.

Additional controls:

  • Pin dependency versions to prevent unexpected updates.
  • Use private package mirrors to reduce exposure to compromised public registries.
  • Verify package checksums and signatures before use.
  • Audit transitive dependencies — not just direct ones.

9. Implement Robust Access Control

Broken access control is the #1 OWASP risk for the third consecutive year. Proper access control must be enforced at every layer.

  • Server-side enforcement only: Never rely on client-side checks. The server must validate permissions on every request.
  • Role-Based Access Control (RBAC): Assign permissions to roles, not individual users. Use the principle of least privilege when defining roles.
  • Attribute-Based Access Control (ABAC): For complex applications, use context-aware policies that consider user attributes, resource properties, and environmental conditions.
  • Deny by default: Access should be denied unless explicitly permitted.
  • Regular access reviews: Audit user permissions quarterly. Remove access when roles change or employment ends.
  • Separation of duties: No single user should have permissions to both initiate and approve sensitive actions.

10. Enforce Content Security Policy (CSP) and Security Headers

HTTP security headers are a low-cost, high-impact defense layer that many teams overlook.

HeaderPurpose
Content-Security-PolicyRestricts sources for scripts, styles, images — primary XSS defense
Strict-Transport-SecurityForces HTTPS connections
X-Frame-OptionsPrevents clickjacking
X-Content-Type-OptionsPrevents MIME-sniffing attacks
Referrer-PolicyControls referrer information leakage
Permissions-PolicyControls browser feature access (camera, geolocation, etc.)
Cross-Origin-Opener-PolicyIsolates your browsing context from cross-origin threats

CSP best practices:

  • Start with a strict CSP in report-only mode to identify violations before enforcing.
  • Avoid unsafe-inline and unsafe-eval — these defeat the purpose of CSP.
  • Use nonces or hashes for inline scripts when they cannot be avoided.
  • Use automated tools like SecurityHeaders.com to validate your configuration.

11. Protect Against CSRF, Clickjacking, and Request Forgery

CSRF Protection:

  • Use the Synchronizer Token Pattern: embed a unique, unpredictable token in every state-changing form and AJAX request. Validate it server-side.
  • Use SameSite=Strict or SameSite=Lax cookie attributes — this is the most effective modern CSRF defense.
  • Verify the Origin and Referer headers for sensitive operations.

SSRF Protection (critical for cloud environments):

  • Validate and sanitize all URLs in user-supplied input.
  • Block requests to private IP ranges (169.254.x.x, 10.x.x.x, 172.16.x.x, 192.168.x.x) at the network level.
  • Use cloud metadata endpoint protection (AWS IMDSv2 required).
  • Whitelist permitted external destinations rather than blacklisting known bad ones.

Clickjacking:

  • Set X-Frame-Options: DENY or use CSP’s frame-ancestors directive.

12. Conduct Regular Security Testing — DAST, Pen Testing, and Bug Bounties

Security testing must be continuous, not a one-time pre-launch activity.

Security testing cadence:

  • Automated DAST: Every deployment to staging (CI/CD integrated)
  • Dependency scanning: Every commit
  • Internal penetration test: Quarterly
  • Third-party penetration test: Annually (required by SOC 2, PCI-DSS)
  • Red team exercises: For high-value applications, simulate real-world attack scenarios

Bug Bounty Programs: Consider a managed bug bounty program (HackerOne, Bugcrowd) to leverage the global security research community. Even a private program significantly increases your coverage.

Code Reviews:

  • Establish a security-focused code review checklist for PRs.
  • Use threat modeling (STRIDE, PASTA) at the design stage — before a single line of code is written.

13. Implement Secure and Observable Session Management

Sessions are the keys to your application. Protecting them is fundamental.

  • Generate cryptographically random session IDs (minimum 128 bits entropy).
  • Regenerate session IDs after login, logout, and privilege escalation.
  • Set appropriate session timeouts: short for high-privilege sessions, longer (with sliding expiration) for general use.
  • Mark session cookies as HttpOnly, Secure, and SameSite=Strict.
  • Invalidate sessions server-side on logout — do not rely solely on clearing cookies.
  • Detect and alert on concurrent sessions from multiple geographic locations.
  • Implement idle session timeouts for sensitive applications.

14. Establish Comprehensive Logging, Monitoring, and Incident Response

You cannot defend what you cannot see. Logging and monitoring failures are #9 in OWASP 2025 — and often the reason breaches go undetected for months.

What to log:

  • All authentication events (success, failure, lockout, MFA bypass attempts)
  • Authorization failures and access control violations
  • Input validation failures (potential attack probing)
  • API errors and unusual response patterns
  • Admin actions and privilege changes
  • System errors and application exceptions

How to do it right:

  • Centralize logs in a SIEM (Splunk, Elastic SIEM, Microsoft Sentinel).
  • Apply behavioral analytics to detect anomalies — unusual data export volumes, off-hours access, geographic anomalies.
  • Set up real-time alerting for critical security events.
  • Protect log integrity — logs must be tamper-evident (write-once storage, digital signatures).
  • Define and test your Incident Response Plan at least annually. Know your runbooks before you need them.
  • Practice tabletop exercises for common breach scenarios (ransomware, data exfiltration, credential stuffing).

Mean Time to Detect (MTTD) benchmark: Industry leaders detect breaches in under 24 hours. The global average was 194 days in 2024.

15. Secure Cloud and Container Configurations

Modern web applications run in cloud-native environments. Security must extend to infrastructure.

Cloud Security:

  • Enable cloud provider security benchmarks (AWS Foundational Security Best Practices, Azure Security Benchmark).
  • Use Infrastructure-as-Code (Terraform, CDK) with policy-as-code enforcement (Checkov, tfsec) to prevent misconfigurations from reaching production.
  • Enable GuardDuty / Defender for Cloud for threat detection.
  • Enforce MFA on all cloud console accounts — especially root/admin.
  • Regularly audit IAM policies and remove overpermissioned roles.
  • Enable CloudTrail / Activity Logs for audit trails.

Container Security:

  • Scan container images for vulnerabilities before pushing to registry (Trivy, Snyk Container).
  • Use minimal base images (distroless, Alpine) to reduce attack surface.
  • Never run containers as root.
  • Use Kubernetes RBAC and Pod Security Standards.
  • Enable network policies to restrict inter-pod communication.
  • Scan Kubernetes manifests for misconfigurations (kube-bench, Polaris).

Secrets Management:

  • Never store secrets in Docker images, environment variables, or version control.
  • Use a secrets manager: HashiCorp Vault, AWS Secrets Manager, or Azure Key Vault.
  • Rotate secrets automatically where possible.

Conclusion

Web application security in 2026 demands a proactive, layered, and continuous approach. The days of treating security as a final-stage checklist are over. With AI-augmented attacks, expanding API surfaces, and cloud-native complexity, every development team must embed security into their culture, tools, and workflows.

The 15 practices outlined here — from Zero Trust architecture and passkey authentication to supply chain management and cloud security posture — represent the current state of the art. Implementing them systematically will dramatically reduce your attack surface and your breach risk.

Security is not a destination. It is an ongoing commitment. Start with your highest-risk areas today, measure your progress, and build security into every sprint.

To build a secure, modern web application with an experienced development team, contact Albiorix Technology — our engineers are proficient in delivering security-first web solutions.

7 Primary Benefits of Web Application That You Need to Know

Nowadays, web applications have become an integral part of our lives. Whether it’s for business purposes or personal use, web applications offer a wide range of benefits that cannot be overlooked.

From accessibility and scalability to cost-effectiveness and seamless updates, these advantages make web apps a preferred choice for many businesses and individuals alike. In this article, we will explore seven primary benefits of web app development that you must know.

So, let’s dive in and discover how web applications can revolutionize the way we interact with technology and enhance our overall productivity.

Key Takeaways

  • Web applications have become an essential part of our daily lives, revolutionizing the way we interact with technology.
  • You’ll find a list of benefits of web applications that make web development a popular choice for businesses and individuals.
  • These benefits make web applications a preferred choice for businesses and individuals, offering a user-friendly, cost-effective, and efficient solution for a wide range of different tasks and activities.
  • The benefits mentioned in this article make web apps a versatile and efficient solution for various tasks, ranging from online shopping and social media platforms to business management systems and collaborative tools.

What is a Web Application?

A web application is a software program that runs on web servers and is accessed through a web browser over the internet.

The primary aim of web application development is to provide specific functionalities or services to users, such as online shopping, social networking, or document collaboration.

Web apps are typically built using web technologies such as HTML, CSS, and JavaScript and may interact with databases and other web application server-side components to process user requests and deliver dynamic content.

Build Responsive Web Applications With Our Web Development Services

We help you design and build high-performing business websites using leading technology stacks that empower your business productivity.

Contact Us

7 Key Benefits of Web Application

Web applications have become an integral part of our digital lives, providing numerous benefits to businesses and users alike. Here are seven key benefits of web apps:

1. Accessibility

Accessibility in web applications means making sure that everyone—including people with disabilities—can use the app easily. This involves designing the app so users can understand, navigate, and interact with it effectively, regardless of physical or cognitive limitations.

One key benefit is that web apps are device-independent. They can be accessed from desktops, laptops, tablets, or smartphones using any web browser, as long as there’s an internet connection. This allows businesses to reach more users.

Ensuring accessibility isn’t just good practice—it builds trust and shows commitment to inclusive user experiences.

2. Cross-Platform Compatibility

Web applications are not tied to a specific operating system or platform. They are developed using web tech stacks such as HTML, CSS, and JavaScript, making them compatible with various platforms.

Cross-platform compatibility of a web application means it works seamlessly on different operating systems, web browsers like Google Chrome, Mozilla Firefox, etc., and a specific mobile device.

It ensures a consistent user experience, reaches a wider audience, reduces development costs, and allows for centralized updates and faster deployment, but may require additional testing and optimization.

Progressive Web Apps (PWAs) offer an app-like experience while maintaining cross-platform compatibility.

3. Easy Updates and Maintenance

Web applications simplify the process of updating and maintaining software. Unlike traditional applications like desktop apps, where users need to manually install updates, web apps are centrally hosted and updated on the server.

This allows web app developers to roll out updates seamlessly, ensuring all users have access to the latest and even the same version without any hassle.

Easy updates and maintenance of web-based applications involve streamlined business processes to make the management of the application’s code, content, and functionality simple and efficient.

It typically includes the following aspects:

  • Modular architecture: The application should be built using a modular and component-based approach. This allows for easier updates and maintenance as individual modules or components can be modified or replaced without affecting the entire application.
  • Version control: Employing version control systems like Git enables efficient tracking and management of code changes. Even remote employees can work collaboratively, maintain different branches for features or bug fixes, and easily roll back changes if needed.
  • Automation and testing: Utilizing automated tools and continuous integration/continuous deployment (CI/CD) pipelines ensures smooth updates and maintenance. Automated tests can be executed to catch bugs and regressions, while CI/CD pipelines automate the process of building, testing, and deploying updates.
  • Content management systems (CMS): Implementing a CMS allows non-technical users to update and manage the application’s content without requiring coding knowledge. CMS platforms provide intuitive interfaces for content creation, editing, and publishing.
  • Scalability and performance optimization: Designing the application with scalability and performance in mind ensures it can handle increased traffic and data. This involves optimizing database queries, caching mechanisms, and utilizing scalable infrastructure.
  • Error tracking and monitoring: Integrating error tracking tools and monitoring systems helps identify issues and potential bottlenecks in real time. This allows for proactive maintenance and prompt resolution of problems.
  • Security updates: Regularly applying security updates and patches is crucial to protect the web-based application from vulnerabilities. Staying up to date with the latest security practices and keeping software dependencies updated minimizes the risk of security breaches.
  • Documentation and knowledge sharing: Maintaining comprehensive documentation, both for developers and end-users, facilitates future updates and maintenance. It ensures that knowledge about the application’s architecture, APIs, and other business processes is well-documented and easily accessible.

Hire Dedicated Web Developers from Albiorix

Our proficient Web developers have the technical expertise, and use smart techniques by leveraging cutting-edge technology to build amazingly creative end applications.

Hire Web Developer Now

4. Cost-Effective Development

Developing custom web applications is generally more cost-effective compared to native or hybrid apps. With web app development, there’s no need to build separate versions for different platforms, reducing development efforts and costs.

Additionally, web apps can be developed using standard web tech stacks, which are widely supported, resulting in a larger pool of developers and reduced web application development time.

5. Scalability

Scalability in web applications refers to the ability to grow and handle increased traffic without slowing down or crashing. As more users access the app, businesses can add server resources like processing power or storage to keep everything running smoothly.

This makes web apps ideal for companies planning to expand. Even during peak usage, a scalable app maintains performance and reliability.

It ensures users have a consistent experience, which builds trust and keeps them coming back. Scalability is a key feature for future-proofing any custom web application as demand evolves over time.

6. Seamless Integration

Web applications can seamlessly integrate with other systems and web services, enabling businesses to leverage existing infrastructure and third-party web services.

They can integrate with databases, payment gateways, APIs, social media platforms, and more, allowing for streamlined workflows and enhanced functionality. This integration capability facilitates data sharing, automation, and better user experiences.

7. Real-Time Collaboration and Synchronization

Web applications make real-time collaboration simple and efficient. Teams can work together on the same document or system at the same time, with every change updating instantly for all users.

This feature removes the need to email files back and forth and helps everyone stay on the same page. It also reduces errors caused by version mismatches.

Whether you’re managing a project or editing a document, real-time syncing boosts productivity and encourages teamwork. For businesses, this leads to smoother workflows and faster decision-making, making web apps a practical tool for modern collaboration needs.

Conclusion

Web-based applications offer accessibility, cross-platform compatibility, easy updates and maintenance, cost-effective development, scalability, seamless integration, and real-time collaboration.

These benefits make custom web apps a popular choice for business processes, ensuring wider reach, better user experiences, and improved efficiency for your business needs.

If you’re planning to build a new web-based application from scratch or need any consulting related to custom web application development, contact Albiorix for the best custom software development services.

Top 10 Best Web Application Examples of Innovative UX Products

Web applications are now an essential part of modern life—helping us connect, shop, and work smarter. From social media platforms to advanced e-commerce sites, they’re reshaping how we interact with technology daily.

In fact, statista reports that the global web app development market is projected to hit $234.70 billion by 2028, growing at a 7.04% CAGR. This rapid growth highlights their impact and future potential.

Whether you’re a business owner looking to boost customer experience or a developer aiming to stay ahead of the curve, web applications offer powerful tools and endless innovation.

As experts in digital trends, we’ve explored the most inspiring examples—designed to showcase real-world functionality, creativity, and industry authority you can trust. Curious which apps are leading the charge? Let’s dive in.

Key Takeaways

  • We have highlighted the list of 10 web app examples along with their brief descriptions to inspire you to create their own web applications.
  • You’ll come across a range of example of web app categories, including e-commerce, education, health, finance, productivity, and social media.
  • Web application examples mentioned here also emphasizes the importance of considering user experience and usability when developing a web app.

What is a Web Application?

Web application development refers to the process of creating software programs that run on a web server and are accessed via a web browser.

These applications are used for everything from online shopping and social media to banking and project management tools. If you’ve ever used Gmail, Facebook, or an online store, you’ve interacted with a web app.

The development process involves two key components: front-end and back-end development. The front-end is the visual part users interact with—built using HTML, CSS, and JavaScript.

On the other hand, back-end development is where all the behind-the-scenes work happens. It includes writing server-side logic, handling databases, and ensuring secure, smooth functionality using languages like PHP, Python, or Java.

As experienced developers know, choosing the right tech stack and architecture is crucial to building fast, scalable, and secure applications. From simple static apps to advanced single-page or progressive web apps, each type serves unique needs.

Trustworthy web application development ensures user-friendly experiences, strong data protection, and performance optimization. When done right, it becomes a powerful tool for businesses and users alike.

Whether you’re planning to build a customer portal or an internal tool, understanding both front-end and back-end development is key to success in today’s digital world.

Build Responsive Web Applications With Our Web Development Services

We help you design and build high-performing business websites using leading technology stacks that empower your business productivity.

Build Your Web App Now

Advantages of Web Applications

Web applications offer several advantages compared to other types of software applications. Some of the key advantages of web applications include:

  • Accessibility: You can efficiently access web-based applications from any device with a web browser and an internet connection, making them highly convenient to deal with secure transactions for users.

    They can be accessed on desktop computers, laptops, tablets, and smartphones, allowing users to access the application from virtually anywhere.

  • Cross-platform compatibility: Your web app is designed explicitly to be platform-independent and can be accessed from different operating systems (e.g., Windows, macOS, Linux), web browsers (e.g., Chrome, Firefox, Safari, Edge), and devices (e.g., desktops, laptops, tablets, smartphones), making them highly versatile and adaptable to different environments like web and mobile applications.

  • Easy updates and maintenance: Your business web app is centrally hosted on web servers, which allows for easy updates and maintenance.

    Updates or bug fixes can be implemented on the server-side, and users can access the latest version of the application without having to install any software locally.

  • Cost-effective: You do not require any specific installation on individual devices for developing web apps, which can save on software distribution, device-specific resources, and installation costs.

    Additionally, office web apps can be easily scaled and hosted on cloud-based servers, reducing the need for costly infrastructure.

  • Collaboration and sharing: A website application is an ideal choice for collaboration and sharing among users. Multiple users can access the same web application simultaneously, allowing for real-time collaboration, data sharing, and communication.

    This makes web applications well-suited for multiple platforms, team-oriented tasks, project management, and other collaborative activities.

  • Easy deployment and scalability: Web applications can be easily deployed on any specific web application server, making them accessible to users worldwide.

    Additionally, web applications can be easily scaled to accommodate growing numbers of users, data, and traffic by adding server resources, making them highly scalable and adaptable to changing business needs.

  • Maintenance and support: Web applications can be easily monitored, maintained, and updated by the development team, ensuring that the application is secure, up-to-date, and running smoothly.

    Additionally, dynamic web applications allow for remote troubleshooting and support, making it easier to diagnose and fix issues.

Web applications offer several advantages, including accessibility, cross-platform compatibility, easy updates and maintenance, cost-effectiveness, collaboration and sharing, easy deployment and scalability, and maintenance and support.

These advantages make a dynamic web application a popular choice for a wide range of applications, from e-commerce and social media to enterprise software and online tools.

Disadvantages of Web Applications

While web apps offer many advantages, they also have some potential disadvantages. Here are some of the main disadvantages of web apps:

  • Performance limitations: Your business web app rely on internet connectivity, and its performance can be impacted by factors such as internet speed, bandwidth, and latency.

    Slow or unreliable internet connections can result in slower response times and reduced performance of web applications compared to locally installed software applications.

  • Limited offline functionality: You require an internet connection to function properly for your business website.

    Offline functionality may be limited or nonexistent, which can be a limitation in situations where internet access is not available or unreliable.

  • Security concerns: Web apps are vulnerable to various security risks, such as cross-site scripting (XSS) attacks, cross-site request forgery (CSRF) attacks, and SQL injection attacks, among others.

    Ensuring robust security measures, such as encryption, authentication, and authorization, is crucial to protect against potential security breaches and data breaches.

  • Browser compatibility issues: It becomes possible that you may encounter compatibility issues with different browsers and versions of website apps, as different browsers may interpret code differently or have varying levels of support for web standards.

    This can result in inconsistencies in the appearance and functionality of web applications across different browsers, requiring additional effort for cross-browser testing and compatibility.

  • Dependency on third-party technologies: Web applications often rely on various third-party technologies, such as libraries, frameworks, and APIs, which may be subject to changes or discontinuation.

    This can impact the stability and longevity of web applications, requiring updates and modifications to accommodate changes in third-party technologies.

  • Limited access to device resources: Web applications typically have limited access to device resources, such as file system, sensors, and hardware capabilities, due to security restrictions imposed by web browsers.

    This can limit the functionality and capabilities of web applications compared to native or desktop applications that have more extensive access to device resources.

  • Data privacy concerns: Web applications may collect and store user data, which can raise concerns about data privacy and compliance with data protection regulations.

    Ensuring proper data handling, storage, and privacy measures, such as encryption and data anonymization, is important to protect user data and comply with relevant regulations.

Despite these disadvantages, web applications continue to be widely used and preferred for many applications due to their accessibility, cross-platform compatibility, and other advantages.

Proper planning, development, and maintenance can help mitigate these disadvantages and ensure that web applications deliver reliable, secure, and efficient performance.

Top 10 Web Application Examples of 2026

Web applications are software programs that run on web browsers and are accessed over the internet. They provide interactive experiences for users and can perform a wide range of functions. Here are some prime examples of web applications.

Let’s explore each web application examples in detail along with its usage. These are just a few examples, and web applications can cover a wide range of industries and functionalities, catering to various needs and interests of users.

1. Google Docs

#image_title

Google Docs is a free online tool from Google that lets you create and edit documents using your web browser or mobile device. It’s part of Google Workspace and works entirely online, so you don’t need to install any software.

With Google Docs, you can write, edit, and format documents anytime. Your work saves automatically, and you can view past versions if needed. It’s also great for teamwork—you and others can edit the same document at once, even from different places.

You can use it on any device with internet access. Google Docs supports sharing, real-time collaboration, and works with different file types. Whether you’re working on a school project, a team report, or personal notes, it’s a secure and trusted tool used by millions worldwide.

Top Features of Google Docs

  • Real-time collaboration
  • Cloud-based storage
  • Document sharing and permissions
  • Version history and revision tracking
  • Commenting and discussion
  • Integrated chat
  • Seamless import and export
  • Powerful formatting tools
  • Add-ons and integrations
  • Offline editing

2. Gmail

Gmail

Gmail is Google’s free email service that lets you send and receive messages using your web browser or mobile device. It’s designed to be simple, secure, and easy to use, whether you’re managing personal or professional emails.

With Gmail, you can search your inbox quickly, sort messages into tabs, and organize emails using labels and filters. You can also star or archive messages you want to keep track of.

It works well with other Google tools like Drive, making it easy to attach or access files. Gmail offers strong security with spam filters, two-step verification, and virus protection.

You can even read and write emails offline. Trusted by millions worldwide, Gmail is a reliable way to stay connected from any device with internet access.

Top Features of Gmail

  • Generous storage space
  • Powerful search functionality
  • Smart categorization with tabs
  • Advanced spam filtering
  • Threaded conversations
  • Integration with other Google services
  • Multiple account support
  • Offline access
  • Smart reply and suggested actions
  • Customizable interface

3. Trello

Trello

Trello is a web-based project management tool that uses boards, lists, and cards to help individuals and teams organize and track their tasks and projects.

Each board represents a project or a workflow, and within each board, users can create lists to represent stages or categories, and cards to represent individual tasks or items. You can easily access them from any operating system.

Cards can be moved between lists and boards, allowing for easy tracking of progress and collaboration. Users can also add due dates, labels, checklists, comments, and attachments to cards, making it a versatile tool for managing projects, tasks, and workflows.

Trello is known for its user-friendly interface and visual approach to project management, making it popular among teams and individuals for organizing their work and staying productive.

Top Features of Trello

  • Boards, lists, and cards
  • Drag-and-drop interface
  • Collaboration and sharing
  • Comments and activity log
  • Labels and tags
  • Due dates and reminders
  • Attachments and integrations
  • Checklists and progress tracking
  • Power-Ups and automation
  • Mobile and offline access

4. Basecamp

Basecamp

Basecamp is a web-based project management and team collaboration software that provides a central platform for organizing, communicating, and tracking projects and tasks.

Basecamp offers a wide range of features including to-do lists, file sharing, team messaging, scheduling, document management, and time tracking. It allows teams to create projects, set deadlines, assign tasks, and collaborate on discussions and comments.

Basecamp also provides a messaging system that enables teams to communicate and collaborate in real-time, reducing the need for excessive email communication.

Basecamp is known for its simplicity and ease of use, making it a popular choice for small to medium-sized teams and businesses to streamline their project management and team collaboration efforts.

Top Features of Basecamp

  • Project organization
  • To-do lists and tasks
  • Message boards
  • File storage and sharing
  • Schedules and calendars
  • Real-time group chat
  • Automatic check-ins
  • Client collaboration
  • Time tracking
  • Mobile apps and notifications

5. Microsoft Office

Microsoft Office

Microsoft Office is a group of software programs created by Microsoft to help with everyday tasks like writing, calculating, presenting, and emailing. It includes well-known apps like Word, Excel, PowerPoint, and Outlook.

Word lets you write and edit documents, Excel is used for spreadsheets and data analysis, PowerPoint helps you build presentations, and Outlook manages emails and calendars.

Other useful tools include OneNote for notes, Access for databases, and Publisher for design work. These tools are trusted by students, professionals, and businesses around the world.

You can use Microsoft Office on a computer, tablet, or phone, whether you’re using Windows, macOS, iOS, or Android. It’s reliable, easy to access, and helps people work efficiently at home, school, or the office.

Top Features of MS Office

  • Chat with yourself in Teams
  • New formatting options in PowerPoint
  • Sync only what you need to with SharePoint
  • Video filters in Teams
  • Using mouse as a laser pointer
  • Place images within cells in Excel
  • Transcribe important meetings in Teams
  • Meeting recaps with Outlook
  • Improve project management with Microsoft Planner

6. Slack

Slack

Slack is a cloud-based team collaboration and communication platform that enables real-time messaging, file sharing, and productivity tools for individuals and teams.

Slack is the prime example of a progressive web app that provides a centralized space where team members can communicate, collaborate, and organize their work, both within and across organizations.

Slack offers features such as channels for group conversations, direct messaging for one-on-one communication, feature-rich user interface, file sharing, integrations with various apps and services, and search functionality.

It is commonly used by businesses and teams of all sizes to streamline communication, enhance collaboration, and improve productivity in a modern work environment.

Top Features of Slack

  • Channels
  • Instant messaging
  • File sharing and collaboration
  • Threaded conversations
  • Mention and notification system
  • Integration with third-party apps
  • App integrations and bots
  • Search and archiving
  • Security and compliance

7. Udemy

Udemy

Udemy is an online learning platform that offers a vast array of courses on various topics, including technology, business, personal development, arts, and more.

It allows learners to access thousands of courses created by instructors from around the world. Udemy courses are typically one of the top video streaming platforms, with additional resources such as quizzes, assignments, and discussion forums.

Learners can enroll in courses, progress at their own pace, and access the course material on-demand from any device with internet access.

Udemy courses are subscription-based web applications designed to be self-paced and offer lifetime access, allowing learners to learn at their convenience and revisit the course material whenever needed.

Udemy is widely used by individuals seeking to acquire new skills, advance their careers, or pursue personal interests, as well as by businesses and organizations for employee training and development.

Top Features of Udemy

  • Extensive course library
  • Course variety and flexibility
  • Expert instructors
  • Self-paced learning
  • Lifetime access to courses
  • Interactive learning resources
  • Course reviews and ratings
  • Q&A and community support
  • Mobile app and offline learning
  • Certificates of completion

8. PayPal

PayPal

PayPal is a popular online payment system that allows individuals, businesses, and organizations to send and receive money electronically.

It serves as a digital wallet, providing a secure way to make online transactions without sharing sensitive financial information, such as credit card or bank account numbers.

Users can link their bank accounts, credit cards, or debit cards to their PayPal account, and then use PayPal to send or receive money to/from other PayPal users or merchants globally.

PayPal is widely used for online shopping, peer-to-peer transactions, and as a payment option on various e-commerce platforms.

It offers buyer and seller protection, as well as a range of additional features, such as currency conversion, donation capabilities, and business tools for merchants.

Top Features of PayPal

  • Online payments
  • Money transfers
  • Buyer and seller protection
  • PayPal Wallet
  • PayPal Business Solutions
  • PayPal Checkout
  • PayPal Credit
  • Currency conversion
  • PayPal.me

9. Webflow

Webflow

Webflow is a website builder that lets you design and build professional websites without needing to write code. It’s popular among designers and businesses who want more control than basic site builders offer.

With Webflow’s visual editor, you can drag and drop elements to create custom layouts. It automatically writes clean HTML, CSS, and JavaScript behind the scenes. You can publish your site to your own domain or use Webflow hosting.

Webflow also includes tools for animations, responsive design, and even a built-in content management system (CMS) for dynamic content. If you know code, you can add custom scripts too.

It’s trusted by users who need modern, mobile-friendly websites—from portfolios and blogs to business sites and online stores—without starting from scratch.

Top Features of WebFlow

  • Visual web design
  • Responsive design
  • Webflow CMS
  • Customizable templates
  • Interactions and animations
  • Code export and customization
  • Hosting and publishing
  • E-commerce capabilities
  • SEO optimization
  • Collaboration and team workflows

10. WordPress

WordPress

WordPress is a popular open-source content management system (CMS) that allows users to create and manage websites and blogs.

It provides a user-friendly interface that makes it easy for individuals and businesses to create and publish digital content without needing advanced coding skills.

WordPress offers a wide range of features, including customizable themes and templates, a plugin web application architecture that allows for extended functionality, a built-in editor for creating and editing content, media management for images and videos, and user management for creating and managing multiple users with different roles and permissions.

WordPress development also has a large and active community of web developers and users who contribute to its growth and development.

It offers a vast library of plugins and themes that users can install to add additional features and customize the appearance of their websites.

WordPress is used by millions of websites around the world, ranging from personal blogs to corporate websites, e-commerce stores, news portals, and more.

It is known for its flexibility, scalability, and ease of use, making it a popular choice for creating and managing websites of all sizes and complexities.

Top Features of WordPress

  • User-friendly interface
  • Theme customization
  • Plugin ecosystem
  • Responsive design
  • Content management
  • Media management
  • Search engine optimization (SEO)
  • User roles and permissions
  • Multilingual support
  • Scalability and flexibility

Conclusion

Web applications have revolutionized the way we interact with the internet, and in this blog article, we explored outstanding examples of web applications that are pushing the boundaries of modern web development.

From social media platforms that connect people around the world to e-commerce websites that provide seamless online shopping experiences, these web applications showcase the power of innovation and creativity in the digital realm.

We discussed the features and user experience of each web application, as well as the technologies used to develop them.

These examples serve as an inspiration for businesses and developers alike, showing the limitless possibilities of website development process and how it can enhance various aspects of our daily lives.

And if you’re in search for the best web development company that helps you build robust web apps just like the web application examples that we discussed in the article, feel free to contact Albiorix.

Angular 16: What’s new in The Latest version

Angular 16 marks a significant evolution in front-end development, introducing powerful enhancements that streamline the developer experience.

This open-source framework, widely used for building modern web applications, now offers better performance, improved reactivity, and simplified code structure. When working on an angular application, developers can take advantage of these improvements more efficiently.

One of the standout updates is the new signals-based reactivity system, which improves how an angular application tracks and updates UI changes, making the process more predictable and efficient.

Angular 16 also enhances server-side rendering and debugging tools, helping developers build faster, more scalable apps.

Whether you’re updating existing projects or starting fresh, running your project locally using http localhost 4200 remains a simple way to test features when you run the following command via your CLI.

Whether you’re updating existing projects or starting fresh, Angular v16 provides the flexibility and tools to create high-quality web applications with ease and confidence. You can always start the server using a cli command that points your browser to http localhost 4200, ensuring your workflow stays smooth.

Key Takeaways

  • Angular v16 includes several performance improvements, such as faster compilation times, faster startup times, and improved change detection.
  • Angular v16 includes improvements to the Angular CLI, such as faster builds, improved error messages, and better support for web workers. These updates help streamline every cli command you execute.
  • Angular v16 includes updated and improved documentation, making it easier for developers to get started with Angular and find the information they need.
  • Angular v16 includes improved compatibility with TypeScript 4.4 and higher, as well as other dependencies such as Node.js.
  • Angular v16 also includes some new features, such as support for custom element tags and improved support for internationalization (i18n). You can test many of these features locally by using run the following command and opening http localhost 4200 afterward.

What is Angular?

Angular is a widely used open-source framework developed by Google for building dynamic web applications, especially single-page applications (SPAs).

Working with an angular application allows developers to build scalable solutions for both small and enterprise-level projects.

It follows the Model-View-Controller (MVC) architecture, helping developers organize code for better scalability and maintainability.

Angular enhances standard HTML by adding custom syntax and directives, making it easier to build interactive and user-friendly interfaces.

Its powerful features—like two-way data binding, dependency injection, and built-in routing—streamline the development process.

With Angular, developers can manage complex applications more efficiently, ensuring faster performance and smoother navigation. Local previews using http localhost 4200 are common when you run the following command in your CLI.

Drive Business Growth With AngularJS Development Company

Hire AngularJS developers from the best Angular development company who has expertise in building robust single-page applications for your business.

Contact Us

New Upgrades of Angular 16

It’s time to highlight the essential features of Angular 16.

1. Brand New Reactivity Model For Angular

We are excited to announce that with the Angular version 16 release, a developer preview of an innovative reactivity model for Angular is a hot topic.

This model brings significant improvements to performance and the overall experience for Angular developers.

The new model is fully backward compatible and interoperable with the current system. It offers the following benefits:

  • By minimizing the number of computations during change detection, you’ll find significantly enhanced runtime performance.

    As we progress with the implementation of Angular Signals, the developers working with Angular development company will experience a notable enhancement in the INP Core Web Vital metric for applications developed with signals.

  • Angular 16 comes up with a simpler mental model for reactivity, clarifying the dependencies of the view and the flow of data throughout the Angular web application development. This helps improve any angular application structure seamlessly.

  • Fine-grained reactivity (fine-grained code loading) is the new feature of Angular 16 that enables precise reactivity, enabling upcoming releases to detect changes exclusively in the relevant standalone components.

  • Makes Zone.js optional in upcoming releases by utilizing signals to notify the framework when the model has changed.

  • Provides computed properties without the need for recomputation in every change detection cycle.

  • To improve interoperability with RxJS, we have devised a plan to introduce reactive inputs, thereby enhancing the compatibility between Angular and RxJS.

In v16, you’ll find a new signals library as part of @angular/core, along with an RxJS interop package called @angular/core/rxjs-interop.. The complete integration of signals into the framework is planned for later this year.

2. Introducing Angular Signals

Angular Signals, introduced in Angular v16, offer a new and efficient way to manage state changes in standalone applications.

Inspired by Solid.js, signals act as reactive functions—you can update a signal using set() and read its current value with get(). This allows for a clean, functional approach to state management.

What makes Angular Signals powerful is their ability to form dependency graphs. Signals can depend on each other, and when one changes, the others automatically update. This creates a dynamic and responsive data flow with minimal manual tracking.

Developers can also easily convert signals into observables using the @angular/core/rxjs-interop package, providing smooth integration with existing RxJS workflows.

This means you can use signals alongside observables for more flexible and scalable application logic.

As Angular continues to evolve, Signals represent a step forward in simplifying reactivity and improving performance, especially in complex UI development scenarios.

Here’s a simple example how to use it with Angular 16:

Copy
@Component({
  selector: 'my-app',
  standalone: true,
  template: `
    {{ fullName() }} 
  `,
})
export class App {
  firstName = signal('Mr Angular’);
  lastName = signal('Dev');
  fullName = computed(() => `${this.firstName()} ${this.lastName()}`);

  constructor() {
    effect(() => console.log('Name changed:', this.fullName()));
  }

  setName(newName: string) {
    this.firstName.set(newName);
  }
}

The code segment presented generates a computed value called “fullName” that relies on the signals “firstName” and “lastName”. Additionally, we define an effect that triggers a callback each time any of the signals it utilizes are altered.

In this scenario, the “fullName” signal is indirectly dependent on “firstName” and “lastName”.

If we modify the value of “firstName” to “David”, the console in the browser will display a log.
“Name changed: Mr Angular David”

3. Improved Server-Side Rendering with Enhanced Speed

The Angular team has identified server-side rendering as the primary area for enhancing Angular.

With the introduction of the new app non-destructive hydration technique called “whole app non-destructive or partial hydration,” the application no longer requires a complete re-rendering by Angular.

Rather than starting from scratch, the Angular framework leverages existing DOM nodes for building internal data structures and binds event listeners to those nodes.

Angular developers can take advantage of various benefits, including:

  • Elimination of content flickering on web pages, resulting in a smoother user experience.
  • Enhanced Web Core Vitals, improving metrics related to page load speed and user interaction.
  • Future-proof architecture that employs primitives, enabling precise code loading. This capability is currently evident in progressive lazy route hydration.
  • Simple integration with existing apps requiring only a few lines of code.
  • Gradual adoption of hydration for components that perform manual DOM manipulation through the use of the ngSkipHydration property in templates.
  • Angular has observed up to a 45% improvement in Largest Contentful Paint (LCP) with full standalone app hydration.

Several applications have already implemented hydration in their production environments and have reported improvements in Core Web Vitals (CWV).

To begin, a few additional lines need to be added to your main.ts file in order to get started.

To begin, a few additional lines need to be added to your main.ts file in order to get started. Once set up, you can test hydration updates by serving your project using a cli command and previewing it via http localhost 4200.

Copy
import {
bootstrapApplication,
provideClientHydration,
} from '@angular/platform-browser';
...
bootstrapApplication(RootCmp, {
providers: [provideClientHydration()]
});

Another notable enhancement in Angular 16 is the inclusion of non-destructive hydration support, which enhances the speed and smoothness of server-side rendering (SSR).

This technique allows you to add server-side rendering of your application on the server and transmitting the HTML content to the browser.

Subsequently, JavaScript behavior and event listeners are attached to transform the page into a fully interactive and functional web page.

Angular 16 introduces a built-in feature called Server Side Rendering (SSR), which significantly enhances the performance and quality of SSR applications.

This feature provides several advantages, such as improved SEO, accessibility, and reduced time-to-interactive (TTI). While SSR has been a long-standing feature in frameworks like React or Next.js, implementing it in Angular posed its own set of challenges.

During the hydration process, the browser employs a non-destructive technique that ensures existing HTML content and attributes remain untouched and unaffected.

This means that any modifications or optimizations made to the HTML content on the server side are preserved.

Moreover, non-destructive hydration serves as a safeguard against potential conflicts or errors arising from inconsistencies between the HTML content on the client and server sides.

4. In Angular 16, the elimination of ngcc is observed

Angular 16 has officially removed the Angular Compatibility Compiler (ngcc), a tool initially introduced in Angular 9 to bridge the gap between the older View Engine and the newer Ivy rendering engine.

This change streamlines the framework by eliminating legacy code and reducing the overall bundle size, leading to improved performance.

With this update, libraries built on the View Engine are no longer compatible with Angular 16 and beyond. While this may appear as a breaking change, it’s worth noting that such libraries were never officially supported in Ivy-based versions.

Another notable improvement in Angular 16 is the long-awaited support for required inputs. Previously, developers used workarounds like component selectors to enforce this behavior.

Now, inputs can be explicitly marked as required, making Angular forms and components more robust and developer-friendly.

These enhancements reflect Angular’s commitment to modernization, efficiency, and developer experience.

Copy
@Component({
 selector: 'app-test-component[title]', // note attribute selector here
 template: '{{ title }}',
})
export class TestComponent {
 @Input()
 title!: string;
}

Regrettably, this approach falls short of being optimal. Firstly, it leads to cluttering of the component selector. Each required input name must be included in the selector, which poses difficulties, particularly during refactoring processes.

Furthermore, it disrupts the functionality of auto-import mechanisms in Integrated Development Environments (IDEs).

Secondly, if we overlook providing a value for an input labeled in this manner, the resulting error message lacks precision, as there is no exact match for such an “incomplete” selector.

Error Message in Angular-16

The newly introduced feature addresses this issue by enabling us to explicitly indicate that an input is required, either through the @Input decorator.

Copy
@Input({required: true})
title!: string;

or the @Component decorator inputs array:

@Component({
 ...
 inputs: [
   {name: 'title', required: true}
 ]
})

Nevertheless, the new solution possesses two significant limitations. Firstly, it solely functions in Ahead-of-Time (AOT) compilation and does not apply to Just-in-Time (JIT) compilation.

Secondly, it remains affected by the strictPropertyInitialization TypeScript compilation flag, which is typically enabled by default in Angular (as it is recommended and beneficial).

TypeScript will generate an error for this property since it is declared as non-nullable but lacks initialization in the constructor or inline declaration.

error message in new angular version 16

Hence, it is necessary to disable this check in order to proceed. One way to achieve this is by explicitly indicating the non-nullability of the property using the non-null assertion operator, even though it must be provided in the consumer template.

5. Esbuild Dev Server

Ng build and ng serve in Angular version 16 now have experimental support for esbuild.

For development server purposes, Angular now utilizes Vite in ng serve. Additionally, both development and production builds are powered by esbuild.

Many developers preview esbuild improvements by starting their angular application through run the following command and visiting http localhost 4200.

Copy
...
"architect": {
"build": { /* Add the esbuild suffix/*
"builder": "@angular-devkit/build-angular:browser-esbuild",
...

To enable the use of “@angular-devkit/build-angular:browser-esbuild” instead of “@angular-devkit/build-angular:browser”, you should make this change here.

6. Binding router Information to Component Inputs

With this capability, the routing data mentioned below will be easily accessible in the dynamic component as input.

As a result, we can utilize inputs to retrieve these values instead of relying on ActivatedRoute. This approach can significantly benefit our application by eliminating a significant amount of redundant code.

Related Post: Resolver in Angular

  • Router data
  • Resolved router data
  • params
  • query Params
Copy
// The current approach, which remains functional.

@Component({
...
})
class SomeComponent {
route = inject(ActivatedRoute);
data = this.route.snapshot.data['dataKey'];
params = this.route.snapshot.params['paramKey']
}
//New approach
@Component({
...
})
class SomeComponent {
@Input() dataKey: string;
@Input() paramKey: string;
//or
@Input() set dataKey(value: string){
//react to the value
};
@Input() set paramKey(value: string){
//react to the value
};
}

7. takeUntilDestroyed and DestroyRef

Gradually, Angular is facilitating a more functional coding style. One step in this direction is the inclusion of the DestoryRef and takeUntilDestroyed RxJS operators. These operators serve as replacements for the ngOnDestroy component’s lifecycle hook.

Previously, if we desired to use ngOnDestroy within functions, it was not possible since it relied on classes.

Copy
@Component({})
class SomeComponent {
destroyRef = inject(DestroyRef);
store = inject(Store);
user
constructor() {
const sub = this.store.select(getUser()).subscribe((user) => {
this.user = user
});
destoryRef.onDestroy(() => {
sub.unsubscribe()
})
//OR
const sub = this.store.select(getUser()).pipe(takeUntilDestroyed())
.subscribe((user) => {
this.user = user
});
}
}

The usage of the takeUntilDestroyed operator is restricted to the constructor context exclusively. If we intend to utilize it outside of the constructor, we need to provide destroyRef as an argument.

In contrast to subscriptions in RxJS, this functionality is internally utilized to handle the cleanup of signal impacts. Consequently, no manual cleanup is required.

Related Post: Angular best practises

Additional features of Angular 16

  • The introduction of standalone schematics in the developer preview allows for the creation of new Angular projects as standalone entities, providing a streamlined process.
  • The Jest testing framework is being experimentally supported, indicating ongoing development and exploration of its capabilities.
  • Developers working with Angular have the ability to specify a nonce attribute for component inline styles, which Angular then includes inlined.
  • In Angular templates, self-closing tags can be utilized to create closing tags for all the affected components, resulting in a more concise syntax.
  • Angular 16 brings an enhancement to the application performance and developer experience by introducing the option to link or bind route parameters with corresponding component’s inputs for the router.
  • The notable inclusion of TypeScript 5.0 support is particularly relevant for ECMAScript decorators that extend JavaScript classes, providing expanded functionality and compatibility.
  • Several schematics have been revised to facilitate independent applications, such as ng-new and the application schematic, the Angular Universal schematic, and the app-shell schematic.
  • Angular Universal allows Angular to render an app on the server, generating static HTML contents, which represents an app state.
  • In Angular 15, Angular Material transitioned to being built on MDC (Material Design Components). In version 16, the Angular team focused on incorporating design tokens from Material Design.

    This enables smoother migration to Angular Material 3 in the future and empowers designers and developers to extensively customize the user interface of their applications.

Easy Way to Install or Upgrade Angular 16

Angular offers multiple Angular development tools. Therefore, you just need to install Angular 16 via npm.

Execute the following cli command in the CLI:

npm install –global @angular/cli@next

Using this command, you can easily install Angular CLI’s latest version on your system. After installation, you can start your angular application using run the following command to open it in the browser at http localhost 4200.

Conclusion

Angular 16 builds on the foundation of Angular 15 and introduces powerful upgrades that significantly enhance application performance and developer productivity.

With a strong focus on reactivity and server-side rendering improvements, Angular 16 brings a more efficient approach to building fast and responsive web applications.

These updates are especially beneficial for AngularJS development companies aiming to create scalable and inclusive digital experiences.

Developers can now expect smoother workflows, faster builds, and improved rendering capabilities—helping deliver high-performance apps that meet modern user expectations and industry standards.

What is Web Development Methodology and how to use it in weprojects

In today’s fast-paced and highly competitive digital landscape, web development projects need to be delivered efficiently and effectively to meet the demands of clients and users alike.

To achieve this, it is crucial to have a well-defined methodology in place that outlines the steps to be taken throughout the project’s lifecycle.

In this blog post, we will explore the importance of having a solid methodology for web development and how it can help ensure project success.

We will also provide an overview of some of the most popular web development methodology, their key features, and how to choose the right one for your project.

Whether you are a project manager, developer, or client, this post will provide you with valuable insights on how to streamline your web development process and achieve better results.

Key Takeaways

  • Choosing the right web development methodology is crucial for the success of web development projects.
  • There are different approaches to web development, including Waterfall, Agile, and Hybrid methodologies.
  • Each methodology has its own strengths and weaknesses, and the choice of methodology depends on the specific project requirements.
  • The Agile methodology is a popular choice for web development projects due to its flexibility and ability to adapt to changing requirements.
  • Communication and collaboration among team members are essential for success in an Agile environment.
  • A customized approach that fits the project’s unique requirements is necessary for successful web development.
  • Ongoing evaluation and adaptation throughout the project’s lifecycle are crucial to ensure success.

What is Web Development Methodology?

Web development methodology refers to a structured approach or process that developers working with the best custom software development company use to create, design, and maintain websites, web pages, and web applications.

It includes a set of guidelines, principles, and best practices that help web developers build high-quality, efficient, and scalable web development projects.

Web development methodologies can vary depending on the project’s complexity, scope, and requirements, but most of them follow a similar set of steps, including:

  • Planning: Defining the project’s scope, goals, and requirements, and determining the resources needed to complete it.
  • Analysis: Conducting research, gathering data, and analyzing user needs to inform the design and web development process.
  • Design: Creating wireframes, mockups, and prototypes that visualize the website’s layout, structure, and functionality.
  • Development: Writing code and building the website’s frontend and backend, including HTML, CSS, JavaScript, and other programming languages.
  • Testing: Conducting quality assurance testing to ensure that the website works as expected, is bug-free, and meets all project requirements.
  • Deployment: Launching the website on the internet and making it available to users.
  • Maintenance: Regularly updating and maintaining the website to keep it secure, up-to-date, and optimized for performance.

General project management statistics and facts suggest that project management software will grow at a CAGR of 10.67% and will be worth $10 billion by 2026.

Some popular web development methodologies include Waterfall, Agile, Scrum, and Lean. Each has its own set of advantages and disadvantages, and choosing the right methodology depends on the project’s specific needs and requirements.

Build Responsive Web Apps With Our Web Development Services

We help you design and build high-performing business websites using leading technology stacks that empower your business productivity.

Build a Website Now

Different Types of Web Development Methodologies

There are several web development methodologies that professional developers use to build websites and web applications. Here are some of the most commonly used ones:

1. Waterfall Methodology

Waterfall methodology is a software development approach that is based on a sequential, linear process. The entire process follows a set of clearly defined workflow methodology stages that must be completed before moving on to the next stage.

The stages of the waterfall model include requirements gathering, design, implementation, testing, and maintenance.

The Waterfall methodology is called so because it flows sequentially, like a waterfall, with each stage completing before the next begins. It was one of the first software development workflow methodologies, and is still widely used today.

According to project management statistics, integrated project management, hybrid, agile, and waterfall are the most popular methodologies used by project managers.

The working process of the Waterfall methodology goes something like this

  • It starts with a planning phase where the requirements for the project are gathered and documented.
  • These requirements are then used to develop a detailed design for the system, followed by the implementation phase where the actual coding takes place.
  • After coding, the system undergoes testing to ensure that it meets all requirements and specifications.
  • Finally, the system is deployed and maintained over time.

Here are some of the key features of this feature-driven development methodology:

  • Sequential approach: Every stage must be completed before moving on to the next stage.
  • Well-defined stages: A series of well-defined stages that include requirements gathering, design, implementation, testing, and maintenance is performed.
  • Emphasis on documentation: It involves significant documentation, which helps ensure that the project stays on track and that all stakeholders are aware of the progress.
  • Clear milestones: This web development methodology provides clear milestones for each stage, which helps project managers track progress and identify potential delays or issues.
  • Limited flexibility: The Waterfall method can be inflexible, as it is difficult to make changes once a stage has been completed and the project has moved on to the next stage.
  • Emphasis on quality: The Waterfall method places a strong emphasis on quality control and testing, with testing taking place at each stage of the development process.
  • Predictable outcomes: It provides predictable outcomes, as each stage must be completed before moving on to the next, and the project plan is generally well-defined from the outset.
  • Suitable for large projects: It is well-suited to large, complex projects with well-defined requirements, as it provides a clear structure for the development process and helps ensure that the project stays on track.

2. Agile Methodology

Agile methodology is an incremental and iterative approach to software development that emphasizes flexibility and adaptability.

This best methodology involves breaking down the development process into small, manageable chunks, or “sprints,” with each sprint focused on delivering a working product increment.

Do you know that by adopting Agile methodology, almost 98% of companies become more successful?

Agile development methodology prioritize collaboration, continuous feedback, and rapid iteration over rigid planning and documentation.

Agile software development methodology aim to deliver working software quickly and frequently using iterative practices, while continuously gathering feedback from stakeholders.

The core values of Agile web development methodology are laid out in the Agile Manifesto, which emphasizes individuals and interactions, working software, customer collaborate heavily, and responding to change over following a plan.

Top features of Agile methodology

  • Flexibility: Agile development methodology is designed to be flexible and adaptable to changes in customer requirements and project scope. The focus is on delivering working software quickly and frequently, rather than adhering to rigid plans and timelines.
  • Iterative Development: It is specifically broken down into small and fixed-length iterations called sprints. Each sprint of an Agile framework focuses on delivering a working product increment that can be reviewed and adjusted based on feedback from stakeholders.
  • Continuous Feedback: This website development methodology prioritizes continuous feedback from stakeholders, including customers, web developers, and project managers. This feedback is used to refine the product and ensure that it meets the needs of the customer.
  • Collaboration: The Agile method emphasizes collaboration and communication between team members. Team members work together to deliver the product and share information to improve the typical web development process.
  • Transparency: Agile web development methodology promotes transparency in the development process. This includes open communication and visibility into the progress of the project, including timelines, budgets, and potential roadblocks.
  • Continuous Improvement: Agile web development methodology is focused on continuous improvement. The goal of an Agile approach is to deliver the best possible product increment at the end of each sprint, while also improving the development process for future sprints.

Develop Web Application Using Agile Methodology With Us

We have a team of talented web and mobile app developers proficient in dealing with all technology stack to deliver the best possible solutions.

Consult Us Now

3. Scrum Methodology

Scrum is an Agile methodology used in software development and project management to manage and complete complex web development projects. It was first introduced in the 1990s and has gained widespread popularity since then.

Scrum methodology is based on the Agile principles of transparency, inspection, and adaptation. The main idea behind this Agile development methodology is to break down complex projects into small projects, more manageable tasks.

These smaller tasks are then completed in short iterations, called sprints, usually lasting 1-4 weeks.

Scrum involves a team-based approach, with a cross-functional team of web app developers, designers, and other professionals working collaboratively on the project.

The scrum team works together to prioritize and plan the tasks that need to be completed during each sprint.

The Scrum framework includes several key roles, including the Product Owner, Scrum Master, Project Manager, and Dev Team.

The Product Owner is responsible for defining and prioritizing the product backlog, which is a list of features and tasks that need to be completed.

The Scrum Master is responsible for ensuring that the team follows the Scrum methodology and for facilitating communication and collaboration. The development team is responsible for completing the tasks and delivering the product incrementally.

Scrum methodology also includes several ceremonies, such as the sprint planning, daily stand-up, sprint review, and sprint retrospective.

These ceremonies are designed to keep the team aligned and to ensure that progress is being made towards the project’s demands.

Scrum methodology provides a flexible and adaptable approach to project management that allows teams to quickly respond to changing business requirements and deliver high-quality products.

4. DevOps Methodology

DevOps methodology is a set of practices that aims to improve the collaboration and communication between software development teams and IT operations teams.

It involves combining the processes, tools, and technical aspects of development and operations teams to enable organizations to deliver high-quality software more quickly and reliably.

In DevOps, software development (including front-end development and back-end development) and operations teams work together closely throughout the entire software development lifecycle, from planning and design to testing and deployment.

DevOps emphasizes the use of automation, continuous integration and delivery, and monitoring to enable faster, more frequent releases of software with improved quality and fewer defects.

DevOps also promotes a culture of collaboration and shared responsibility among team members, as well as a focus on customer needs and project goals to improve productivity.

By adopting DevOps practices, organizations can increase their agility, speed, and efficiency in delivering software products, as well as improve customer satisfaction and business outcomes.

5. Lean Methodology

Lean methodology, also known as Lean Manufacturing or simply Lean, is a systematic approach to process continuous improvements that focuses on maximizing value for the customer while minimizing waste.

It was first developed by Toyota in the 1940s and has since been adopted by many other organizations in a variety of industries.

At its core, Lean approach is about identifying and eliminating waste in all forms. This includes activities that do not add value to the customer, such as overproduction, waiting, excess inventory, unnecessary transportation, overprocessing, defects, and unused talent.

By eliminating waste, organizations can improve quality, reduce costs, increase efficiency, and enhance customer satisfaction.

The Lean methodology focuses on emphasizing continuous improvement, which involves constantly seeking ways to improve processes and eliminate waste.

This is achieved through a cycle of Plan-Do-Check-Act (PDCA), also known as the Deming Cycle, which involves identifying opportunities for improvement, testing solutions, measuring results, and making necessary adjustments.

Overall, the Lean methodology is a customer-centric approach to process improvement that emphasizes efficiency, effectiveness, and continuous improvement.

6. Prototype Methodology

Prototype methodology is a software development approach that involves creating a working model of a software system or application in order to gather feedback from stakeholders, identify requirements, and refine the design.

In prototype methodology, a preliminary version of the software is developed, often using rapid application development (RAD) techniques, with the aim of testing and validating ideas, as well as exploring alternative design options.

The prototype may be refined and modified based on user feedback until a final version of the software is produced.

This approach can be particularly useful in situations where there is uncertainty about the requirements or design of a software system, as it allows stakeholders to see a tangible representation of the system before significant time and fewer resources are invested in development.

It can also help to minimize the risk of developing a system that does not meet user needs or expectations.

These are just some of the most commonly used web development and agile methodologies. Each approach has its own strengths and weaknesses, and the choice of methodology will depend on the specific project requirements and constraints.

Conclusion

To sum up, a well-defined methodology is essential for successful web development projects. It helps ensure that projects are completed on time, within budget, and to the required quality standards.

By choosing the right methodology, project managers can optimize team performance, enhance communication, and achieve better outcomes.

Ultimately, a solid methodology can be the key to delivering outstanding websites that meet or exceed clients’ expectations.